Forgot.....
Stinky, have you found the inlet manifold to withstand the heat from the engine?.....
I too, have polished a manifold and coated it with Glisten PC...... it isn't fitted as yet (spare) and will be intrigued to watch what happens to the coating when it comes into close proximity to the exhaust manifold........
frats,
Rosco
PPC - POR system
Stinky,
I had another thought on your brush coating - Glisten PC has great ability to be blocked back and re-coated - you won't notice any difference, except that you can remove runs and debris from the original coats......
One BIG word of WARNING though......... do NOT break through the coating and hit the substrate - I did this to my front over-rider and didn't realise it...... result was that prior to re-coating, it all looked keyed up and even ..... until the subsequent coat went on........ where the wet/dry had rubbed the chrome is now scratches covered in clear....... for all to see........ but the rest of it is quite good ....... you would not know that I did it in two sessions......
frats,
Rosco
spider rust
Ok - it had to happen, and I had to do it.......
You may recall I mentioned in the Glisten PC thread that POR made a cautionary note on applying it to bare steel/iron......
As some would recall, I polished and coated my carburettor by hand with this product - and was rewarded with satisfying results...... however..
The re-inforcing plate which holds down the front of the fuel chamber is made of annodised steel..... I used a buffing wheel to bring it up prior to coating it...... and must have unknowingly broken through the coating.
It has been some nine/ten months since applying the Glisten PC coating, but whilst playing around under the bonnet yesterday, was shocked to find what appeared webs of rust under the coating - yes, shocked......... obviously this is going to increase and I am a little concerned now on coating some of my chromework.......
See.... I did state at the start of my POR thread that I would pull apart and report any product which does not perform.......
Where this rust has appeared reveals no indication by feel - and at this point in time I do not know why...... I am currently of the opinion that the coating may have ceased at the edge of the plate - and moisture has "creeped up through the metal (seeped is probably a better way of putting it) resulting on what appears tributaries or "trickles" of rust....
There is absolutely no indication that the metal is oxidising, and I know that sounds a paradox.... but, by feel - it's a surface problem not a structural one..... the Glisten PC coating is doing its job - still rock hard and shining.....
So, before you rush out and jump aboard on this one ..... please consider..
Investigation will ensue and full findings posted in due course.......
pics included.....
frats,
Rosco
update
Anyone watching this who wants an update on the Glisten problem - I've just put some pics into photobucket and will try to explain what I'm trying to illustrate......
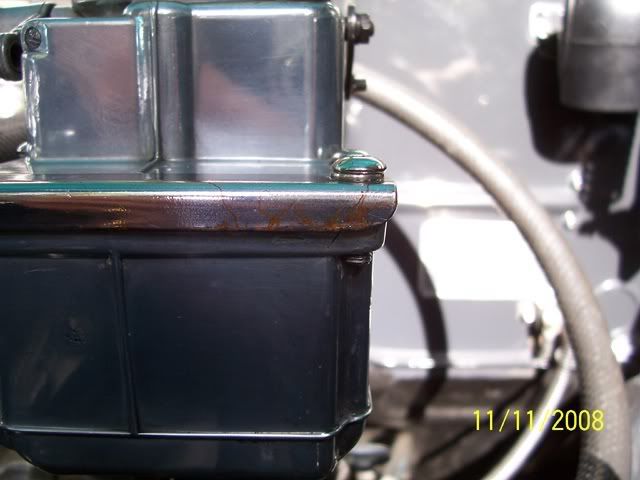
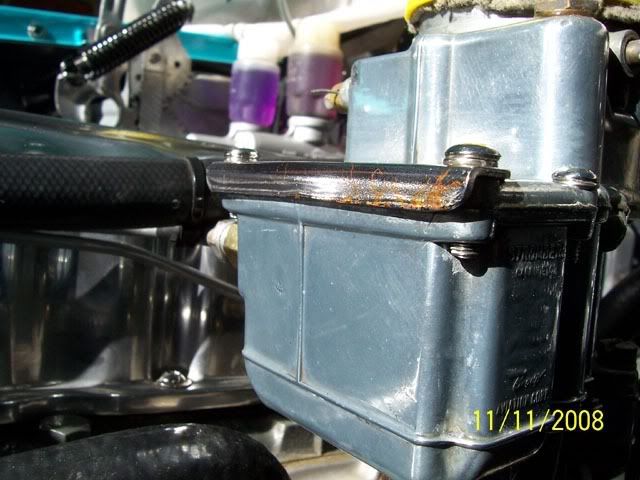
These two pics are of the "spider rust" which POR clearly stated may occur.... it did....
My investigation thus far has been that it is most likely caused by not fully coating the piece - as you would recall, we went through some pretty ordinary weather on our trip to Yamba earlier this year - I feel the whole engine bay got an absolute drenching for two consecutive days - the weather didn't clear until we got up as far as Coff's........
This, i believe has surmounted into water getting "drawn" in by the heating and cooling of the carburettor...... in very damp and humid environment.......
The piece in question (re-enforcement bar) was only coated with Glisten PC on the outside facing edges..... not from the underlying edge.
I believe, this is where humidity was "drawn" through the metal and has tracked along the surface under the coating.
I do not believe there is any structural compromise...... this I feel is purely cosmetic - there is absolutely no evidence of the surface showing signs of breaking down or lifting away from the substrate......
This bar is coated in either zinc or anodised..... I put it to the buff to bring up the finish prior to coating it with Glisten PC..... and.... "may" have broken through the coating - I'm pretty confident this is what has happened...... the spare wheel clamp, boot-lid striking plate and all other zinc-plated components I have coated thus far are all intact and showing absolutely no sign of failure........ relax - it was me not the product...
I did NOT pre-treat this with AP 120.....
POR recommend that they be first contacted if bare steel is to be coated with Glisten PC AND that bare steel be "baked" in an over prior to coating ..... I did not do this either.
I now pre-treat with AP 120 AND use a heat gun on any metal prior to coating it with Glisten PC...
pics....
some time down the track, I will remove this and destroy the coating - I want to be sure that it will not degrade the substrate and will leave it in situ for some time........
frats,
Rosco
Next project.......
You will probably recall I intended to coat some chrome with Glisten PC... I have had a few attempts at this and so far had very good results.....but there ARE pitfalls.........
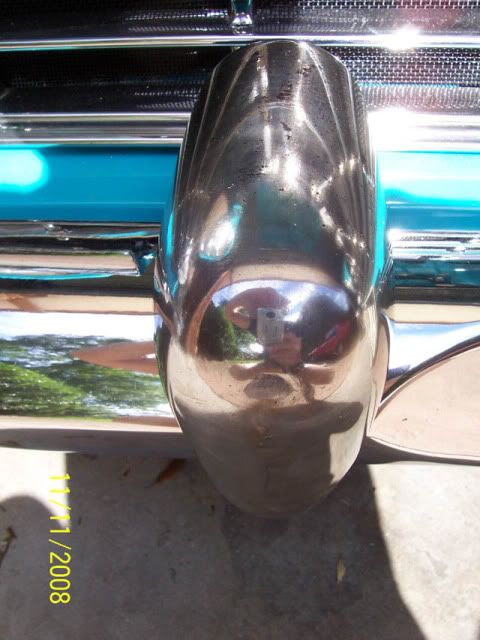
My front r/hs over-rider is shot- chrome plating almost worn away and showing signs of rusting - I rubbed it back with wet/dry and buffed it up as best as possible... by me, anyway........
The first attempt of applying Glisten PC to chrome was this piece.... most wouldn't have bothered.... but I wanted "worst possible" and decided to "sacrifice" this piece......
I did not have any strategy for applying it, didn't know mixes or pressures and just "winged" it....... results were pretty ordinary and I had problems on each of the first three attempts to coat this piece....... spotting, bubbling and runs all over the place - not to mention the blasted stuff getting under the covers over the car....... make ABSOLUTELY sure you cover anything you don't want permanently "dusted" when using this stuff.... after four (4) days, it will be rock hard and must be mechanically removed - I have now blocked down the entire upper surfaces of both my cars which were in the garage at the time - even though they were covered in nylon car covers........ I feel plastic drop sheets are the only alternative - if you cannot remove them from the area.........
Back to the story..... or novel...... the first two pics are after three coats - and having blocked them back with 120 grit dri-lube (painters paper) - good luck if you want to block down with wet/dry..... by golly this stuff goes hard.......
What I didn't realise, was that I had also broken through the bottom layer of Glisten..... it didn't show up - as it all looked uniformly "keyed"....... I had in fact "keyed" the underlying chrome (or what is left of it).......
pics...
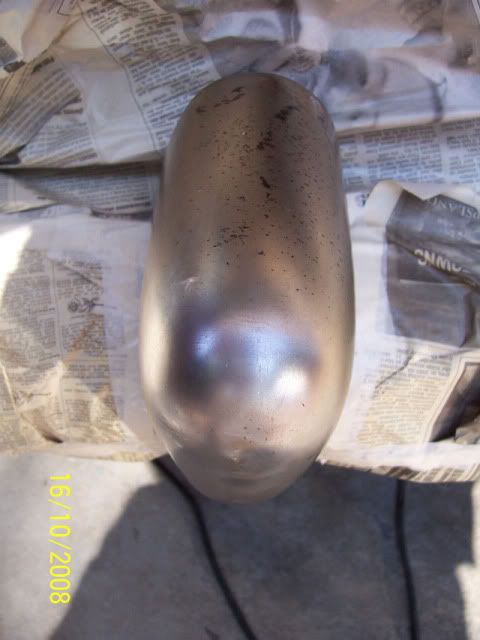
What you see, is the dulled and ordinary state of what I wanted to dress up - strangely, I believed the lustre and depth of Glisten would bring out some restoration of the reflective qualities of chrome.........
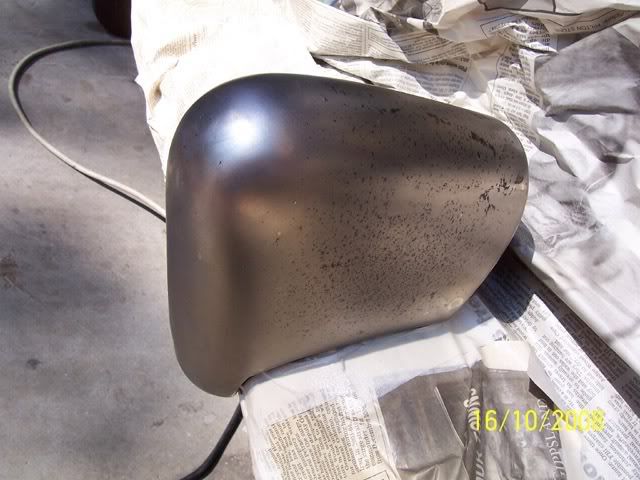
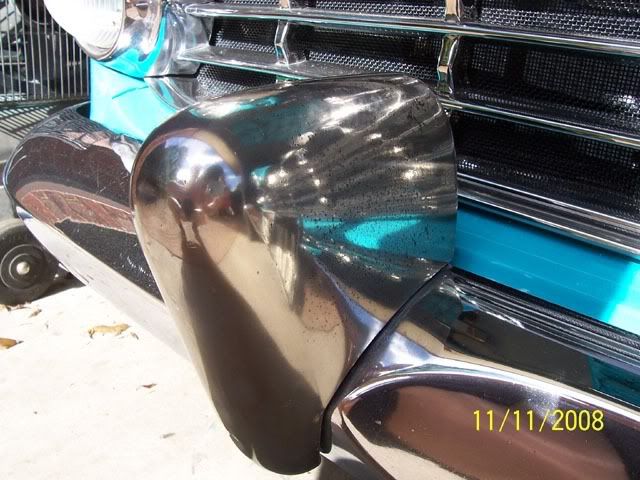
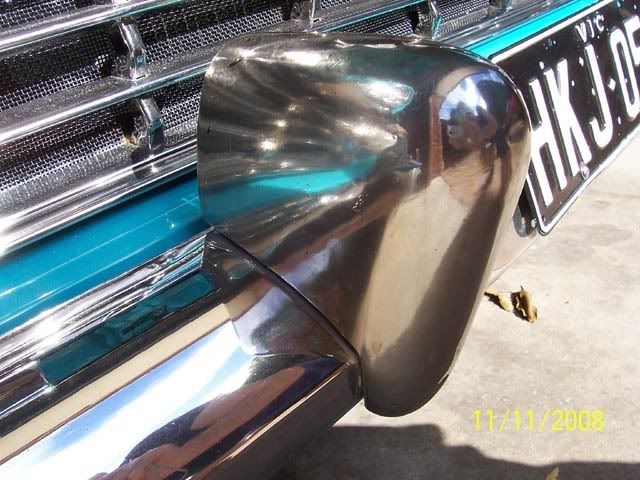
Last pics are of the end result - and I must admit, these have not looked this good since I stopped using those products referred to as liquid emeries.........
If you look closely - you will see where I (as a kid) painted some Killrust black over the rusted areas - these are well and truly pitted and blocking down did nothing to remove them- they lay well down under the surface of the surrounding plating......
And....... there are "creatures" in this coating...... at the time of spraying, the final coat (once I'd learned the mix and pressure/gun settings) was pretty good.......but - creatures being sticky beaks (no pun intended)....... for all to see..... entombed for eternity.... watch for this at your inspection.......
just how long this coating lasts is beyond me- and whether spider rust will form over the exposed bare steel......... again, these were not treated with AP 120 nor dried using a heat gun........
pics....
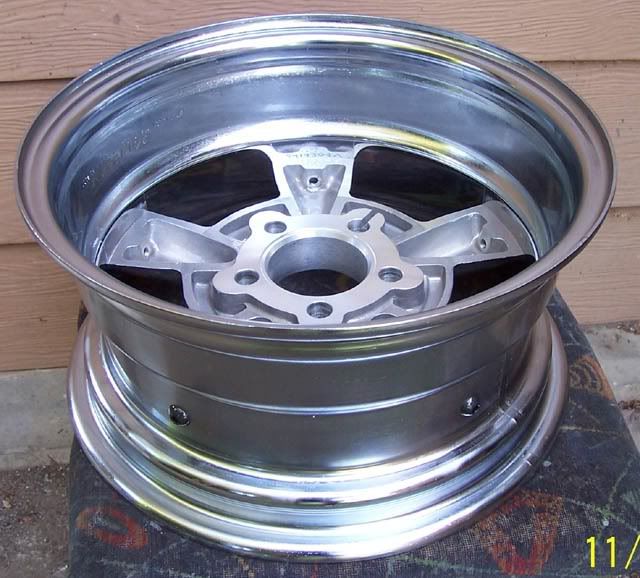
One final addition to this Glisten thread...... the dragway wheels.......
I have now finished coating the inner sides and external inner rim (where the tyre covers) with Glisten Pc.... it has had a week to cure and I feel is quite acceptable...... if you look closely at where the spoke meets the rim - you will see the chrome plating which is mirror finish.... I now feel I will coat the outer chrome rims with this but leave the outer alloy for further work..... I would like to get the alloy up a bit more.... dragway did a very good job in polishing it, but I have done better with my rocker cover and other alloy components.......
pic...
any questions happily answered.....
frats,
Rosco
(nearly typed "farts"....sic)
You will probably recall I intended to coat some chrome with Glisten PC... I have had a few attempts at this and so far had very good results.....but there ARE pitfalls.........
My front r/hs over-rider is shot- chrome plating almost worn away and showing signs of rusting - I rubbed it back with wet/dry and buffed it up as best as possible... by me, anyway........
The first attempt of applying Glisten PC to chrome was this piece.... most wouldn't have bothered.... but I wanted "worst possible" and decided to "sacrifice" this piece......
I did not have any strategy for applying it, didn't know mixes or pressures and just "winged" it....... results were pretty ordinary and I had problems on each of the first three attempts to coat this piece....... spotting, bubbling and runs all over the place - not to mention the blasted stuff getting under the covers over the car....... make ABSOLUTELY sure you cover anything you don't want permanently "dusted" when using this stuff.... after four (4) days, it will be rock hard and must be mechanically removed - I have now blocked down the entire upper surfaces of both my cars which were in the garage at the time - even though they were covered in nylon car covers........ I feel plastic drop sheets are the only alternative - if you cannot remove them from the area.........
Back to the story..... or novel...... the first two pics are after three coats - and having blocked them back with 120 grit dri-lube (painters paper) - good luck if you want to block down with wet/dry..... by golly this stuff goes hard.......
What I didn't realise, was that I had also broken through the bottom layer of Glisten..... it didn't show up - as it all looked uniformly "keyed"....... I had in fact "keyed" the underlying chrome (or what is left of it).......
pics...
What you see, is the dulled and ordinary state of what I wanted to dress up - strangely, I believed the lustre and depth of Glisten would bring out some restoration of the reflective qualities of chrome.........
Last pics are of the end result - and I must admit, these have not looked this good since I stopped using those products referred to as liquid emeries.........
If you look closely - you will see where I (as a kid) painted some Killrust black over the rusted areas - these are well and truly pitted and blocking down did nothing to remove them- they lay well down under the surface of the surrounding plating......
And....... there are "creatures" in this coating...... at the time of spraying, the final coat (once I'd learned the mix and pressure/gun settings) was pretty good.......but - creatures being sticky beaks (no pun intended)....... for all to see..... entombed for eternity.... watch for this at your inspection.......
just how long this coating lasts is beyond me- and whether spider rust will form over the exposed bare steel......... again, these were not treated with AP 120 nor dried using a heat gun........
pics....
One final addition to this Glisten thread...... the dragway wheels.......
I have now finished coating the inner sides and external inner rim (where the tyre covers) with Glisten Pc.... it has had a week to cure and I feel is quite acceptable...... if you look closely at where the spoke meets the rim - you will see the chrome plating which is mirror finish.... I now feel I will coat the outer chrome rims with this but leave the outer alloy for further work..... I would like to get the alloy up a bit more.... dragway did a very good job in polishing it, but I have done better with my rocker cover and other alloy components.......
pic...
any questions happily answered.....
frats,
Rosco
(nearly typed "farts"....sic)


Andrew - don't do this brake fluid - I won't ever again.......
It's silicone - and now worth probably more than the components which would normally need replacement in "service".......
I got duped into putting it into both my hydraulic systems when I modified the car in 1982...... was told a whole heap of stuff and the only bit which has proved correct is that it is non hygroscopic....... it does not attract water......true - but any which gets into the system goes to the lowest point and this requires a flush through periodically...... when you put the brake on or push in the clutch - air is drawn in through the pin-hole in the cap of the reservoir - along with a miniscule amount of humidity/water/vapor from water through the radiator etc....... eventually, this will build up in the system and must be flushed out.......
The principle is great, and the cost when I did it was competitive ........ only marginally more than conventional.......
But - and I have written on this a number of times - WARNING!......
Do NOT allow any component which has been subjected to regular brake fluid to come into contact with this silicone fluid - the rubbers will turn to marshmallow.........
I had the opportunity to fit "new" everything when I decided to go with this - new lines, rubbers and hoses - everything - and now must continue to do so........ over the years, it has been more and more difficult to find the product...... Shell were marketing it for some time as Ultra - but it was clearly stated as silicone........ that went off the market and I had no end of trouble trying to find a replacement supply...... thank goodness for Harley Davidson...... they use it.... and this is now where I can get supplies of it....... at around BRB...
in 2005, 1 litre of the stuff was $49.90 (2 x 500 ml bottles).....
In 2007, 330 ml cost me $29.95....... I use one bottle to flush both my brake and clutch systems twice a year....... but, I can tell you the cylinder bores on each component which I have dismantled and inspected have absolutely no signs of pitting or corrosion - just a dulling where the rubbers have worked on the bores.......
Better..... you can literally pour it over anything - paintwork etc and simply wipe it off...... it's inert - won't affect anything - unless you want to spray...... and the "fish eyes" appear on anything you haven't cleaned proplerly.......
My suggestion Andrew - if you want purple brake fluid - have some professional colour it......
And to reap the benefits a lot cheaper - flush your system as often as you like compared to taking on this alternative......... especially after summer and winter - maybe even seasonally for a bit of insurance.......
Is that another novel, Harko......
frats,
Rosco

Rosco, to answer your questions the coating has stood up well to the heat of the engine, there is no noticable dulling, peeling or any other nasty things.
I won't bother about blocking or recoating, it was done mainly out of laziness. Not that my car is a show car, but I didn't want to spend hours cleaning the engine bay when the time came, with this stuff you can just wipe off grease, dirt etc.
I won't bother about blocking or recoating, it was done mainly out of laziness. Not that my car is a show car, but I didn't want to spend hours cleaning the engine bay when the time came, with this stuff you can just wipe off grease, dirt etc.
Just keep me breathing and still in charge of some of my faculties, Andrew - I don't plan on making an exit any time soon........
Stinky, thanks - from what I saw of you bay - there's alleged "show cars" out there who are running well behind you....... looks schmick.....
I won't do my rocker cover - I don't mind putting the cloth over it - sort of re-juvenates my satisfaction - but there are many other pieces which will get the treatment ..... especially those which I have removed copious quantities of skin over the years trying to get at........
I coated the exhaust pipe/chromed extension joint with Glisten - and it turned a very dark shade of brown..... this was my main concern..... I had not considered the "inflamatory" potential when used on the intake manifold as I don't believe the alloy would stand up to that intensity of heat to ignite the Glisten ......
Thanks for your replies....
frats,
Rosco
cutting/polishing glisten pc
Ok another update on Glisten PC.....
I have successfully managed to "cut and polish" the coating...... by golly it's tough..... don't even think about using a cutter which is formulated for acrylic..... this stuff will laugh at it (and you).
In my arsenal of creams, potions and spells....... three shelves of the stuff.... I worked my way up from finest until I found the first one which actually started to take one of the "runs" back...... it was Meguiar's medium cut cleaner (Meguiar's call their cutters..... cleaner)......
The one from all my collection which I would suggest is a factory label (All cars paint supplies, Croydon) 2K rubbing compound...... this one worked well but not on its own.......
I like to block back and compound using a firm rubber (or steel for flat surfaces) pad and tightly binding it with stockingnette (under various names)........
I feel that the open weave permits the removed material to be drawn away from the cutting surface thus not clogging and scouring the surface of the paint.......
Glisten PC ..... yes, comes up very nicely, but you'll have to "lean" into it......
I do NOT use power tools to buff...... I cannot state which,what or how this product responds to these machines and processes.........
I feel it pertinent to state here that there is probably little purpose waxing this coating..... it truly is rock hard and UV stable...... I would probably suggest trying to get a "finished" state at the conclusion of compounding..... of course, you can wax if you want - you may get a deeper finish, but I very much doubt it...... as we have discussed, it is a very deep finish, but will not result in a mirror depth.... sort of glazed is probably the best description.........
frats,
Rosco
update
You may very well want to read this - I have had another two failures.......
There is something about this Glisten PC that I have not fully understood......
I was of the opinion that I eventually learned to "perfect" the application of this product .... but sadly, have again found "issue".....
Dragway wheels.....
I have successfully coated the insides of all five (5) wheels and also the internal (inside the tyre) of the rims.
After many different applications on other components, I decided it timely to coat the outer chrome rims of these wheels - I do not want to coat the alloy centres yet - I feel I can get a bit more "finish" from them than as supplied from the factory......
I decided to "trial" coat one of the outer wheels and followed my developed procedure ...
I painstakingly polished, cleaned and masked the wheel and mixed up sufficientGlisten PC to do the three coats as suggested....
I recorded the temperature and humidity (as I have learned to do with all POR products - it is humidity cured, and I want to have access to application conditions should some defect present itself....... it has!).
I have had success with the first wheel - and the coating remains intact after some three weeks.
I spent an entire day off polishing, cleaning and preparing/masking the remaining four (4) wheels and mixed up a considerable amount of Glisten PC to do the job........
Armed, protected and ready to "perform" the ritual - I set about the first of the remaining wheels....... just into the job, I found beading forming on some of the rim but continued - as I did with the remaining three (3) wheels......
I double coated these areas on subsequent coats and managed to "fill" some of these "issues"...... until all were coated with three (3) generous coats of "permanency".......... and left to cure..
You may recall that I hand polished my intake manifold (HR) and decided to coat it in GPC....
During the first coat I found two small sections which "beaded" on application.
Subsequent coats seemed to "resolve" this beading - and I decided to leave it for a number of weeks and "polish" them out with a cutting compound......
After coating the remaining four (4) wheels - the opportunity arose to attack the intake manifold and I set to it with some 2K cutting compound and hard rubber backing blocks...(as used on the front over-rider).....
To my disgust - a small section "flaked" off revealing the highly polished alloy underneath.... I prodded and probed many other areas only to find similar "failures".....
I have read, re-read and can just about recite the documentation now and probably have not fully identified the cause....
As most would know - I keep a pretty disciplined log of my labours on this old bus and have only drawn likely conclusions as to why this has resulted....
With the cure time of four (4) full days required - I decided to remove the coating on the outer wheels using the POR solvent - it has proved to be a life-saver that I did this - even though it took a full day to effect its removal..
What I found with the intake manifold, was that it was impossible to block back the coating without scratching into the substrate - by golly, can you imagine how I would have felt if forced to do this to the four wheels......?
I have spent nearly two full weeks getting that intake manifold back to it's polished state - as it sits now......
In this time, I have read, re-read and downloaded everything I can find from POR to identify the cause and also read through my log......
The ONLY two (2) things I can find are to do with humidity and cleaning of the substrate......
The humidity in question was that of 5% greater ( 55% as opposed to 50%.. surely not....?)
POR recommend the use of AP 120 - a cleaning/prep solution to effect a better bonding.... I had used this on both the intake manifold and the outer wheels.....
They also recommend the prior use of Marine Clean..... which I did not do on the problem components..... but.... read on, dear followers.....
On the instructions pasted on the back of Marine Clean - if you can read them (it is written in "Lilliput" writing ...... even my strongest spectacles for use in finding electrical "tracking" were struggling to decipher the dots and dashes of "english"....) it stated not to be used on Alloy....... surely you would stop reading there, wouldn't you?..... I did- forgive me if you feel me errant in my cessation........
After downloading the data sheet - and reading further into the now "readable" letters of the instructions - it recommended "diluting" the ratio to 10:1 miniumum for "Alloy"....... arrgghhhhhh........
My log stated that I had indeed used Marine Clean on the components which have succeeded...... because they are of course chromed steel - the outer chrome was not coated due to possible "etching" of the highly polished alloy centres by the marine clean....... make sense - does to me.... but I'm only a poor simple soul.......
Yesterday, after identifying this as being the likely root cause - I followed the procedure again, but this time, used the diluted Marine Clean.
I prepped the outer rim of one wheel, polished with POR Artisan metal polish, wiped down with POR solvent, diluted Marine Clean, washed and dried, AP 120 using non abrasive scourer, washed and dried, air dried, heat dried, wiped down again with a new terry towel cloth and compressed air dusted - finally masked up......
Temperature 22 deg @ 50% rel humidity..... exactly what I had succeeded with previously and mixed up the GPC......
Set all the equipment and protection up and "bit the bullet" at 18:00 - with success......... re-coated at 18:30 and finally at 19:05..... temperature and humidity unchanged during all three coats.........
So, now I sit - at this computer, sharing my "experience" with those of you who are following this thread......
yes, indeed...... this is very particular material..... and it will fail unless all the numbers line up........ please consider my experiences with these failures to avoid - at my expense........ a great product, but is very quirky and must be obeyed.........to the letter (if you can read them....1)......
all questions answered - and any "issues" hopefully resolved.......
frats,
Rosco