Can anyone shed some light on a high beam light problem I'm having.
When you turn the head lights on, the high beam light is on even when the lights are dipped to low beam. When the lights are on high beam the warning light is brighter than when there on low beam.
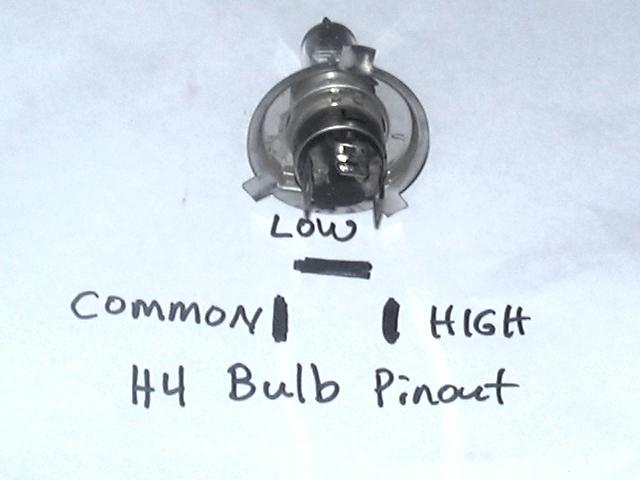
I've wired up the new headlights with halagon bulbs but wasnt sure which wire went to which post on the back of the head lights as I had nothing to copy from. Could this be the problem.
Any advice would be appreciated.
Mal
High beam light
High beam light
Malcolm W.
High beam light
Yes as per original setup. The more I think about it the more I think maybe thats where the problem is.
Malcolm W.
High beam light
OK, I just went out and unplugged the headlight terminals and hey presto the high beam light is now working properly.
So now all I need is if someone can tell me which wire is to go to which terminal
So now all I need is if someone can tell me which wire is to go to which terminal
Malcolm W.
Yep -think I've got it -
on one side of your lighting switch there are three terminals marked "2" "3" and "4" - well on the diagram, anyway.
#2 (the front one - on the diagram - at the firewall end of the switch) has two white leads for your front parking lamps.
#3" (centre) has a black lead for your tail lamps and license plate lamps.
#4 (rear) - this is the one you want - has a light blue lead - this goes to the "batt" terminal of the dip switch - from there it goes (through its switching) to three light green (high beam) leads - one to each high beam lamp and the third back to the high beam indicator........
The final terminal of the dip switch goes to the two tan leads - low beam headlamps................ hope this helps..............
I understand you have modified electrics and may very well be using connections on stalk type switches - if your leads to the high/low or especially "tail" lamps are not correctly made - this will give you a number of different aspects with the high beam indicator............
mail me if I can be of any further assistance, Malcolm - it's not fatal - just needs the correct connections made - ps - try earthing your instrument panel - the high beam indicator needs a good "earth" to make the bulb glow - it may be getting that through the "back door" via one of the lamps.......... yes you can have flow in both directions at the same time.....
frats,
Rosco
Last edited by rosco on Sat Apr 05, 2008 11:17 pm, edited 1 time in total.


Malcolm,
your lighting switch will protect over-current draw to some extent - if it gets stressed, your lamps will flicker and you will hear a "buzz" from the themo-bi metal breaker in the lighting switch.
I would suggest, when you have the engine running, have your high beams on for quite some time - you're going to be doing a lot of playing around whilst the engine is ticking over or whatever - after 20 mins or so - have a really good "feel" of all the wires in your headlamp circuit - the one most likely to get warm first will be the light blue one - if you even "sense" it getting warm - I would seriously suggest you fit a relay - it will protect not only the wiring, but also the switch.................
frats,
Rosco

High beam light
Rosco & Woodzy,
Thanks very much for your help. Woodzy that configuration is what I eventually came up with.
I feel like a real tool what I found was that if you squint and look really closely in good light the new light sockets I used have which pin is which on the back of the terminal. Or if all else fails one can put their glasses on and its as plain as day to see.
Thanks again
Mal
Thanks very much for your help. Woodzy that configuration is what I eventually came up with.
I feel like a real tool
Thanks again
Mal
Malcolm W.
-
ekdave1962

- Posts: 413
- Joined: Tue Oct 30, 2007 8:06 pm
- State: NOT ENTERED
- Location: Geelong Vic
High beam light
Malcolm W.