G'Day to all FB EK r's /Holden lovers,
Intro, I have always loved the look of our poor man's Chev (any holden) and due to work commitments, space restrictions may earlier cars did not come to fruition with the addition of lack of knowledge. I recently came about a purchase of my current FB that is the subject of this post.
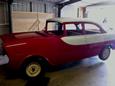
Pre painted, (non FB colour scheme, sorry die hards!) rolling shell, no rust, and plenty of back up spares with another car to cannibilise. I purchased the cars in Brissy from Darwin whilst posted there. In the 12 months waiting to transfer the car, which was at my bro inlaws house, I picked the brains out of this forum, and, it has been an inspirational form of motivation for taking on such a task. I have my gregorys and maxwells that I use to cross reference my progess to assist and of course the forum as mentioned.
So, the rolling shell came with a reconditioned 138! , no..after serial check, its a 132, standard suspension, running gear etc. Engine / Gearbox has been removed, crossmember and rear axle removed, no interior fittings, door shells only, no fuel / brake lines, all components to be stripped, cleaned, inspected/replaced /painted as required.
Things I will change :
Lower 1.5"
Twin BXOV-1
Original gen - Alt
Vac wiper/ dual fuel pump - Elec Wiper/ single fuel pump
Original master cans corroded - PBR reservoirs and Vh44
I have the potential to go all original, however, my goal is not Nats Entry, but a nice clean old holden, occasionally turning heads when the old bus is on the road.
So here begins my project (a little back dated) that I share, and by all means for comment of which I am sure to receive either way.
Photos shortly
Cheers Renno
RENNO's Rebuild / Resto
RENNO's Rebuild / Resto
- Attachments
-
- tpt blue.jpg (40.77 KiB) Viewed 4153 times
-
- Holden_FB.jpg (31.45 KiB) Viewed 4153 times

Re: RENNO's Rebuild / Resto
Hi Renno
Looks like you have picked up a good score there and I don't mind the red and white my V6 FC sedan is red and white. Red ones go faster mate.
Do you know what colours they are? Mine was also painted when I bought it and Although mine are not original FC colours they are Holden colours.
Anyway good luck and keep the photos coming.
Regards
Neil
Member of WA FB/EK Car Club
Frankenstein EK V6 Ute
The Reverend FB Station Wagon Project
1950's Commer Light Truck (2.5 Ton)
Frankenstein EK V6 Ute
The Reverend FB Station Wagon Project
1950's Commer Light Truck (2.5 Ton)
Re: RENNO's Rebuild / Resto
Firakraka
I contacted the seller and he said that he did not know the colour (a bit strange when he got it sprayed) anyway, got a colour match to spray the firewall / eng bay and it looks spot on. The white also has a touch of pearl through it as well, that he didn't mention it and I only noticed
when it was delivered. I'll post photos of that as well, did may fuel pump rebuild today!
Cheers Renno
FUEL PUMP REBUILD
Stripped the single acting pump down and needed to swap the top section out with one of my dual acting top sections in order to fit the valves, this also accommodated the the small retaining piece for the said valves. I stripped it, homemade ultrasonic clean, acid dip, re kit, clear coat (dont know if this will last) and lob done 
- Attachments
-
- CAM00089.jpg (24.63 KiB) Viewed 4102 times
-
- CAM00091.jpg (29.19 KiB) Viewed 4102 times
-
- CAM00096.jpg (26.02 KiB) Viewed 4102 times
-
- CAM00095.jpg (26.67 KiB) Viewed 4102 times
-
- CAM00101.jpg (22.96 KiB) Viewed 4102 times
SUPPORT MEMBER / FIREWALL
Here are pics of the end result removing the support member, paint stripping, de rusting, priming and painting black. I ummed and arghed them decided to re paint the eng bay and firewall with matching colour ( as I did not know the original colour the paint hop matched it and called it Reynolds Red). Anyway, I'm no spray painter by all stretch of the imagination, however my bro is and with his guidance and tips I think I managed to pull it of with my ingersol compressor I bought for $150 that needed a cut out switch replacement, $70
- Attachments
-
- CAM00038.jpg (34.04 KiB) Viewed 4100 times
-
- CAM00041.jpg (30.07 KiB) Viewed 4100 times
-
- CAM00039.jpg (32.03 KiB) Viewed 4100 times
-
- CAM00045.jpg (31.63 KiB) Viewed 4100 times
Re: RENNO's Rebuild - X MBR
The X Mbr....
The x mbr looked in pretty good nick (king pins had been replaced) but decided to strip, clean and paint all components, apart from the rubber seals, I found out after trying to install the first of the four control arms (right upper) that I needed new bushes.
After making my spacer and tightening down to it, I removed the spacer and continued to screw down expecting the bush to torque upto to required mark....Nup....just continued which decreased the gap between the control arm ends. So a new set of bush's are on the way.....Will see how things go then
- Attachments
-
- CAM00027.jpg (29.4 KiB) Viewed 4059 times
-
- CAM00022.jpg (29.68 KiB) Viewed 4059 times
-
- CAM00043.jpg (32.61 KiB) Viewed 4059 times
Re: RENNO's Rebuild / Resto
making good progress mate
I started with nothing and still have most of it left.
Foundation member #61 of FB/EK Holden club of W.A.
Foundation member #61 of FB/EK Holden club of W.A.
-
bootlegger
- Posts: 2070
- Joined: Sat Sep 26, 2009 7:52 pm
- State: NOT ENTERED
- Location: sydney
Re: RENNO's Rebuild / Resto
Well done. Have fun.
Re: RENNO's Rebuild / Resto
Hi Renno
Looks like you are really getting into it, love the colour in the engine bay I am going to do that with my ute when I get to that stage but havent picked a colour yet.
Keep the pictures coming.
Regards
Neil H
Looks like you are really getting into it, love the colour in the engine bay I am going to do that with my ute when I get to that stage but havent picked a colour yet.
Keep the pictures coming.
Regards
Neil H
Member of WA FB/EK Car Club
Frankenstein EK V6 Ute
The Reverend FB Station Wagon Project
1950's Commer Light Truck (2.5 Ton)
Frankenstein EK V6 Ute
The Reverend FB Station Wagon Project
1950's Commer Light Truck (2.5 Ton)
Re: Carby Re Build
- Hmmm which part was that?
- CAM00120.jpg (28.92 KiB) Viewed 3798 times
My first attempt at rebuilding a carby, enjoyed it........seeing them work is another story
Got my bits n pieces and it was time to rebuild the two BXOV-1's, using the Enthusiast Carby Guide and manuals, I got started. All seemed pretty straight forward, though I sort clarification on my accelerator pump measurements to satisfy my mind which I posted and provided a video link regarding my query. (thanks Harv's )
My main jet removal / insertion tool was an allen key with a notch cut out the end of it.
So..... in the end I installed the fuelmiser kits , venturi sleeves, .046 main jets and # 70 power bypass valves (will post results of performance etc when I get to that stage)
So now I've got my extractors, manifold and carbies ready to go on. Next thing in this area is to sort out linkages, the manifold has the rod for that kind of setup which I am more inclined to follow. I would prefer a setup that utilises the original throttle / accelator linkages with minimal modification etc. Any suggestions?
Will sort some more posts out soon
Beers n Cheers
Renno
- Attachments
-
- done!
- CAM00131.jpg (21.94 KiB) Viewed 3798 times
-
- done!
- CAM00130.jpg (23.69 KiB) Viewed 3798 times
-
- Accelerator pump assy
- CAM00122.jpg (22.12 KiB) Viewed 3798 times
-
- Getting there!
- CAM00123.jpg (25.81 KiB) Viewed 3798 times
-
- venturi sleeve
- CAM00132.jpg (23.06 KiB) Viewed 3798 times
-
- Venturi sleeve
- CAM00134.jpg (20.71 KiB) Viewed 3798 times
-
- The remove /insert tool
- CAM00121.jpg (27.57 KiB) Viewed 3798 times

Re: RENNO's Rebuild / Resto
Cool, though that Allen key is setting my teeth on edge  . Could have been worse I guess... could have been needlenose pliers.
I guess you're looking for a setup similar to the one on the top of page 86 of the Guide? Sometimes this is a relatively easy job (like the one at the bottom of P98), bolting up to the existing linkage. Sometimes you can't get enough travel and have to extend the linkage out (like the one on page 100).
Post a pic of the manifold and I'll see what I can do.
Cheers,
Harv.
327 Chev EK wagon, original EK ute for Number 1 Daughter, an FB sedan meth monster project and a BB/MD grey motored FED.
Re: RENNO's Rebuild / Resto
Yeh Harv's
Not the best tool but I was very gentle! I used a plastic insert to take up the gap, it was a smooth process, and yes again the guide yet again is my reference for my linkages .
Cheers
Renno
Not the best tool but I was very gentle! I used a plastic insert to take up the gap, it was a smooth process, and yes again the guide yet again is my reference for my linkages
Cheers
Renno
Last edited by Lex68 on Mon Sep 01, 2014 6:14 pm, edited 1 time in total.
Re: RENNO's Rebuild / Resto
The manifold I intend to use.
- Attachments
-
- CAM00144.jpg (26.03 KiB) Viewed 3766 times
Re: RENNO's Rebuild / Resto
OK, for this I'd:
a) mount carbs to manifold with gaskets and phenolic spacers.
b) Install a Speco throttle rod stop (part number 21174 for a pack of two, suits 5/16” rod) at either end to lock the rod in place.
c) Buy four Speco carburettor arms (part number 221102 to suits 5/16” rod). Install one each for the carbs (in line with them), one for the return spring and one at the radiator-end of the bar to connect to the factory linkage.
d) Buy two Speco ball joint assemblies (part number 221093.4 for a 4" length) and use them to connect the carburettor arms to the carburettors.
e) Operate the carburettors from closed to wide-open-throttle (WOT). Check you don't get linkage bind or pulling over-centre. Adjust the ball joint assemblies to suit. In some cases you may need to remove the phenolic spacers to prevent over-centre. On the Cain triple manifold I have, there was no way in hell to avoid it... I had to lower the rod .
.
f) With the linkage adjusted, measure how far the carburettor arm at the radiator end of the bar needs to move to get the the carburettors from closed to wide-open-throttle (WOT) (might be a few inches). This is how far the factory linkage will need to move.
g) Operate your factory linkage and see if it swings far enough to get those few inches. If it does, you can connect to the factory linkage. Move the carburettor arm along the rod to the point where you get slightly more than you need out of the original linkage, then connect via a third Speco ball joint assembly (work out the right length before you order this one). Of the factory linkage will not swing far enough, you need to extend it like the photo on P100. The longer the extension, the further travel you get at the end of the extension bar.
h) Once you have it all in place, bear in mind that you have round rod. No matter how hard you tighten the carburettor arms, they slip over time (this is why Speco also sells hex rod and appropruiate arms). Consider giving them a small tack weld to hold them in the right place. You could have used hex rod, but it will not bear very well in your round manifold lugs. You can buy hex-rod uniballs, but they will not easily mount to your manifold (this is what I had to do with my triples...painful).
Cheers,
Harv
a) mount carbs to manifold with gaskets and phenolic spacers.
b) Install a Speco throttle rod stop (part number 21174 for a pack of two, suits 5/16” rod) at either end to lock the rod in place.
c) Buy four Speco carburettor arms (part number 221102 to suits 5/16” rod). Install one each for the carbs (in line with them), one for the return spring and one at the radiator-end of the bar to connect to the factory linkage.
d) Buy two Speco ball joint assemblies (part number 221093.4 for a 4" length) and use them to connect the carburettor arms to the carburettors.
e) Operate the carburettors from closed to wide-open-throttle (WOT). Check you don't get linkage bind or pulling over-centre. Adjust the ball joint assemblies to suit. In some cases you may need to remove the phenolic spacers to prevent over-centre. On the Cain triple manifold I have, there was no way in hell to avoid it... I had to lower the rod
f) With the linkage adjusted, measure how far the carburettor arm at the radiator end of the bar needs to move to get the the carburettors from closed to wide-open-throttle (WOT) (might be a few inches). This is how far the factory linkage will need to move.
g) Operate your factory linkage and see if it swings far enough to get those few inches. If it does, you can connect to the factory linkage. Move the carburettor arm along the rod to the point where you get slightly more than you need out of the original linkage, then connect via a third Speco ball joint assembly (work out the right length before you order this one). Of the factory linkage will not swing far enough, you need to extend it like the photo on P100. The longer the extension, the further travel you get at the end of the extension bar.
h) Once you have it all in place, bear in mind that you have round rod. No matter how hard you tighten the carburettor arms, they slip over time (this is why Speco also sells hex rod and appropruiate arms). Consider giving them a small tack weld to hold them in the right place. You could have used hex rod, but it will not bear very well in your round manifold lugs. You can buy hex-rod uniballs, but they will not easily mount to your manifold (this is what I had to do with my triples...painful).
Cheers,
Harv
327 Chev EK wagon, original EK ute for Number 1 Daughter, an FB sedan meth monster project and a BB/MD grey motored FED.
Re: RENNO's Rebuild / Resto
Cheers Harv's
Awesome info and great hints and tips. Will definitely look into it.
Thx Renno
Awesome info and great hints and tips. Will definitely look into it.
Thx Renno