
Guys,
Electrical not really my thing, i can wire up and follow what im told to use/do, however i was wondering if any of use guys use smaller batteries than what would be considered standard these days?
i just mean in overall size, but want it to be generic enough that i can hunt one down relatively easily if i was say had a flat in a small country town, then i wouldnt have to wait weeks if that makes sense?
i want to keep my battery in the engine bay, perferrably in the orginal location for simplicitybut would look to build a smaller mount etc... but not sure what sort of battery to use? brand? model? etc...
im not going to be running anything fancy just, halogen headlights, vintage air air con system, and basic stereo apart form that i cant think of anything than would pose an issue.
any help would be appreciated.
Cheers
Nathan
Small Batteries
Small Batteries
FB/EK Holden Car Club of W.A. Inc
Foundation Member
Foundation Member
Re: Small Betteries
>>>>>>>>>>>>>>>>>>>>>>>>>>>>>>>>>>>>>>>>>>>>>>>>>>>>>>>>>>>>>>>>>>>>>>>>>>>>>>>>>>>>>>>>>>>>>>>>>>>>>>>>NoMAD wrote:Guys,
RE;...............>>>>>>>>>Small betteries<<<<<<<<<<<<...........
Cheers
Nathan
Small betteries ......sound like they made in New Zulund mate ....
Don’t you find it Funny that after Monday(M) and Tuesday(T), the rest of the week says WTF?
Re: Small Betteries
My V6 EK had a Jet Ski battery in it - about half the size of a normal one . Never gave me any trouble 
I started with nothing and still have most of it left.
Foundation member #61 of FB/EK Holden club of W.A.
Foundation member #61 of FB/EK Holden club of W.A.

Re: Small Betteries
Not sure about small ones, but be careful to get one that is compatible with the charging current that your car puts out


Alan
Member No.1 of the FB EK Holden Car Club of WA (Woo-hoo sweet!)
Member No.1 of the FB EK Holden Car Club of WA (Woo-hoo
Re: Small Betteries
Hi Nathan,
I have no formal education in electrics or electronics - but I believe we can all appreciate batteries have come a long way since 1960-62.
I suppose the best guide would be the amp/hr rating.
Batteries originally fitted to our vehicles were very large in size for their rating. They were vented and the cases often cracked and leaked.
You would be best advised to do a check with a reputable battery supplier - pick his brain for detail and make a decision on just what you believe is appropriate.
I would further suggest you do not consider a deep cycle, gel or AGM type of battery - they are not suited for crank battery use.
A standard, sealed wet cell battery would be my suggestion. They rarely ever reach 100% SOC (state of charge) - and can tolerate a little heat in an engine bay..... no battery likes heat - and is why modern manufacturers sometimes fit batteries to the rear of the vehicle.
A deep cycle battery will suffer greatly in life expectancy if ever reduced below half it's capacity... they do NOT like a solid heavy hit.. as in cranking an engine over, they like to be charged at a bulk/absorption rate then brought slowly up to "float" approaching fully charged.
Crank batteries are a totally different proposition... they can take a solid "hit" when cranking, will discharge very low without suffereing a substantial amount of cell damage and like to be recharged to about 70% SOC very quickly.... a totally different installation to that used in RV installations.
My concern in fitting an ultra small battery would probably be its life expectancy. Check with the original capacity ... something is telling me it was 46AH... but I do not have my books here with me - we are away for 3 months on tour..... someone will post up the info you need ... I very much doubt a battery supplier will have any reference to FB or EK Holden on their books... they'd probably struggle with HQ now.....
A standard grey motor certainly does not have the compression of that in modern multi-valve efficient engines....
I have roll started my old bus when it had a grey without a battery at all...... the very limited generator output was sufficient to provide enough for the coil .... it's all volts, precious little amps.
Others can correct me if I'm wrong - but it is my understanding that a generator will produce its own field... an alternator won't - and needs some battery trickle to excite the fields.
If you are still running a generator - idling in traffic for extended periods with them, and other components operating "might" cause you grief ...
A 40A alternator with built in regulator is probably one of the best solutions once you decide to "un-original" your vehicle....but, and I hope you can appreciate my suggestion - I have regretted just about every change I have made to my old bus - I would dearly love to have it original now....... yes, the then belief that modern fittings were an "improvement" at the time were desirable.... but now, I yearn for what the old car used to be...... hope that makes sense....
I note you intende to run A/C - we might just be stretching the ability of the generator to cope with Halogen, A/C and probably a hefty stereo system...... the maximum output of a generator from the regulator was around 17A from memory.... with these additions - I'd point you towards fitting an alternator... 40A should be sufficient.
Headlamps - and I note you intend to fit halogen - these will be your primary concern with capacity..... mainly if you leave them on without the engine running - that stereo will also draw down the charge.
Halogen - Nathan .... you MUST NOT use the original loom to run these headlamps. I expect you will probably select bulbs with a high beam of 100W each and probably 65W on low..... these are far too heavy for the original thin headlamp wires.
PM me if you want help with fitting relays and upgrading the wiring... it's not a big job... and fairly straight forward and easy to effect.
Another big NO, NO - is protecting the headlamp supply with a single fuse...... if it blows - all your lights are gone...... not a pleasant situation to be in at night travelling at speed... even worse if it is raining.
One little trick you might consider when attacking this project is to fit a strip of LED's under each of the engine bay "gutter" rails.
These will never be noticed when looking into the bay.... but in the event of a breakdown - they are a godsend....
I wired mine to the front parking lights..... so, if at night - all I have to do is switch the lighting switch to "park-tail" and I have engine bay lighting down both sides of the engine.
Some people connect the parking lights to the headlamps.... I'm not convinced this is a great way to go - yes, it is probably a safety aspect - if a headlamp blows, you still have a parker to be seen with... but I like the switching from park to head and vice-versa - to me, it looks "unique" to the older Holdens.
Sorry, gone overboard again.....
frats,
Rosco
Re: Small Betteries
sorry Rosco.
i do love all the info however, and i plan to rewire everything with a new loom suitable for halogens and have a diagram for wiring relays for the halogens (i think it may even be an old one of yours if I'm not mistaken)
the LED's under the gutter rail is genius as well just have to steal that for sure, i remember it pissing down with rain and trying to get my girlfriend at the time to come out of the HG i had to hold the torch because i was doing 500 things at once and my mouth was to small to hold it, i did even consider taping it to my head before asking her hahaha
i will look into the original specs of a battery to suit a 6cyl like a HQ or something which ran a/c and see what i can dig up on newer batteries.
thanks Rosco.
cheers
Nathan
FB/EK Holden Car Club of W.A. Inc
Foundation Member
Foundation Member
Re: Small Betteries
Sure, Nathan - it would make very good sense to run an alternator if you are running a Red already.
If I'm not mistaken - the only generator bracket for a red was from an EH... the HD was the first to come out with an alternator.
It is an absolutely simple change-over providing you purchase an alternator with an inbuilt regulator... I don't have access to my logbook build when I did it - but mine was a Bosch 40A.... I expect they also come in 55 - anything over that would be excessive.
The only connections you need to make with one of these alternators is
1 - a suitably sized lead from the alternator output to the positive terminal of your battery.
i.e. - for a 40a alternator - you must fit one of suitable size to carry those 40a... don't mess around with tinsy leads here, Nathan - no need to go as far as a solenoid/cranking lead... but make one up which will carry the 40a without any stress or generation of heat.
2 - an additional lead from the battery negative terminal to body earth (many don't do this - it really is a MUST).
If your remove the voltage regulator from the firewall - there is also a black lead which runs from behind it to body earth - this is why you must replace that earth by running a separate one from the battery to the body.
3 - a lead from the "ind" terminal of the alternator to your "GEN" idiot light.... that's it.
if my memory serves me correctly, there is a brown wire which runs into the loom from the voltage regulator.. I can't recall what the terminal on the regulator was.. but the brown lead, I beleive goes directly to the gen light bulb in your instrument cluster.
You must also connect the two red leads of the B+ at the existing regulator togther in a junction box. (becomes supply to your vehicles power input from the battery) - one of these comes up from the starter soleoid (this is the supply line from the battery to the vehicles ignition and lighting switch bus-bars - via the voltage regulator).
By removing the voltage regulator, you are removing the reverse current protection - and low voltage drop out circuits to the vehicle from the battery.
But - with the inbuilt regulator in the alternator - it looks after the output from the alternator - and will not allow voltage to reverse flow back through it. It virtually becomes an independant unit.... and only supplies output to the battery when needed. Very clever.
As for those headlight circuits - yes, please do take a close peek at what I did .... I probably over-engineered mine... but I wanted to make sure I had some lighting should an open or short circuit develop whilst on the road at night.... worst possible case - I'll lose one of four headlight beams - each of mine (high/low - both left and right) are protected by a dedicated fuse.... the relay with fuses is available from an auto sparky.
All you want your current headlight wiring to do from the existing switch is to turn on the two relays.... one for high beam, one for low...
Compared to what they used to supply (the bulbs of the original headlights) - relays are almost zilch in comparision... your headlight switch will live forever under this load.
Another little trick I did, Nathan - whilst I was at it.... was to connect the horn to my high beam relay.... so that I "flashed" the high beams whenever I hit the horn.......
To do this properly, I had to fit a diode in the supply line from the high beam relay to the horn.... or, when the lights went to high beam - the horn would continually sound........ the diode allows only operation of the headlights when the horn is sounded, not the horn when the headlights are on.
To make this work, you will need to "reverse" the driven lead of your horn.... it is operated by providing "earth" - at the steering wheel horn button...
This is relatively easy to do... I fitted a permanent "earth" to the horn - then fitted a relay to operate the positive feed to it.
The horn button operates this relay. When the button is pressed, the relay "finds" earth and closes a positive feed to the horn.
By doing the above - it is possible to use this positive feed to energise the high beam relay to the headlights... not rocket science - but when you hit the horn for any reason (usually as a warning) - you want to attract as much attention as possible to your approach....
If you are in one of the states who do not allow such connection - just remove the fuse between the horn power output of the relay to the headlight high beam relay.... and re-insert it afterwards.......
Think that's about it for now... I did an awful lot more to my loom to incorporate "security"... but I would not recommend you follow my lead...... my wife will absolutley not go near our car unless I'm there.... the circuitry and design I put into it would absolutley astonish you...
At one stage, I had a separate ignition coil wired to the starter switch. The starter switch was "insulated" from body earth....
if someone attempted to start the engine without "de-lousing" my security.... they would know all about it up their right arm.... I got caught so many times, I removed it...... it became "unfun"....
I only ever allowed this to happen once to one of my friends - the "shock" (excuse pun) was absolute...... and I have not been forgiven.
Enough for now...
Chase up that wiring diagram - i'd be interested/comforted to learn that it is the one I posted. I have not made any improvements to that - so, if it is the one you have - it has worked perfectly in my old bus for some 25 years......
frats,
Rosco

Re: Small Betteries
Nathan,
I went with a sealed battery for the wagon - I had a small space left with the V8 in place, and no boot to relocate it to. I could have relocated into the cabin, but wasn't too keen at the time (maybe one day it will get relocated into the rear quarters behind the trim... the wagons have some cool spare space there). I took the dimensions I wanted, and went to Battery World, then matched it up.
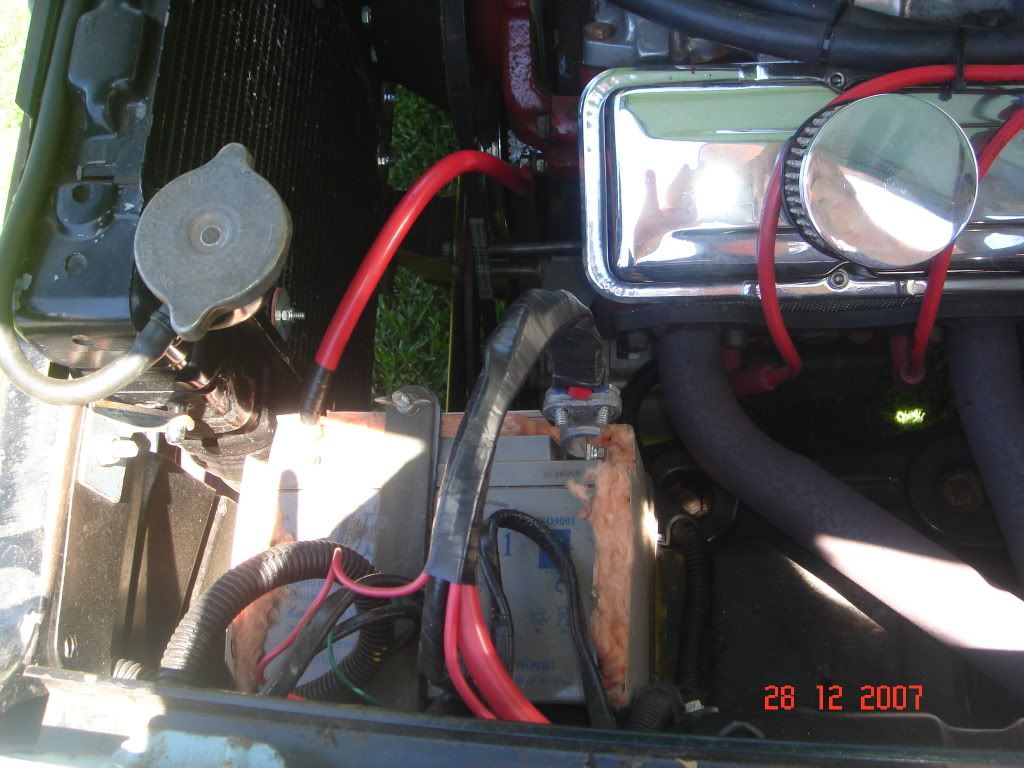
Ignore the terminals... just temporary . It was still pretty close, so I made up a sheet metal box and scavenged some pink batt offcuts out of the house ceiling to insulate - havn't cooked it yet. It has had some pretty bad abuse over the last few years - sits for a few months, then cranks over a SBC until she fires, runs for 15 minutes then shuts down again. I've got a 120A Bosch alternator driving it, which seems to charge OK in the 15 minutes she runs. I'm running H4 halogens and twin thermos with grandiose dreams of air conditioning one day. No stereo... the Holley fuel pump is too bloody loud
  .
.
I really like the idea of Rosco's LED lighting... just need to sneak some out of SuperCheap without looking like a ZimPirate
Cheers,
Harv.
I went with a sealed battery for the wagon - I had a small space left with the V8 in place, and no boot to relocate it to. I could have relocated into the cabin, but wasn't too keen at the time (maybe one day it will get relocated into the rear quarters behind the trim... the wagons have some cool spare space there). I took the dimensions I wanted, and went to Battery World, then matched it up.
Ignore the terminals... just temporary
I really like the idea of Rosco's LED lighting... just need to sneak some out of SuperCheap without looking like a ZimPirate
Cheers,
Harv.
327 Chev EK wagon, original EK ute for Number 1 Daughter, an FB sedan meth monster project and a BB/MD grey motored FED.
Re: Small Betteries
Sorry Nathan - gunna hijack this a bit.
Harv, the LED strips I got were from Jaycar... I think they come in a 30 strip. I chose the hard pc backed version for under the gutters.
If you want my suggestion - take a peek at the US based on-line ordering DXreme..... it will take about a month for them to come in - but the price is about quarter of what Oz sells these LED products for.... you might have to wade through the catalogue to find what you want.
I have ordered and received quite a few sets of SMD5060 units - 24 superbright LED's for my outside lights on the caravan.
They replace the incandescent globes and fit nicely behind the rectangular lenses.
I used a 7812 voltage regulator - to protect these LED's from over-voltage (won't kill them, but controlling the voltage makes them live a lot longer). The 7812 will cost you all of $1.50 and is the most simple thing to fit to the supply line of the LED. It is good for about one amp... you are not going to come close even with a strip of 30.
The incandescents the van manufacturer used drew 1.2 Amps each... there are two of them.
The 5060 LEDs each (24 on a board) draw 230 mA ( 0.24 of an amp)....... and throw out so much light, you can't look at them.
You will find the strips of LED's at DXtreme... but you'll have to wait around a month for them to arrive..... you can make payments by PayPal......
If you are concerned with fitting the regulator - don't..... it's easy peasy...
There are three legs. The centre one is earth - it is also connected to the mounting tag.
The left leg is your supply in - the right one is the feed to the LED... that's it - you'll get a constant 11.6v into the LED's.
All you will need to do to connect them up is to run the earth of the LED to the mount of the 7812.
You will need a supply from whatever you choose to tap into on your vehicle - as mentioned, this goes to the left pin.
Then finally, a lead from the right hand pin to the LED positive.... job's done.
I have also used a strip along the lower edge of my rear screen rubber - covered by a length of clear red perspex... it is my "high level" brake light - you simply don't see it until it is lit...... being dark behind the perspex - you reall have to be looking to find it on top of the rubber.
I have also fitted two lengths of the 30 strip behind the upper aperture of the bootlid (sedan)... there is a wonderful hollow section there to hide stuff.
I have wired this to my boot-lid. I have also fitted an isolating switch to turn them off when the boot is open for extended periods.
You would be amazed at just how much light 60 superbright LED's throw into your boot.
You are going to believe I am crazier than you might already conceive - but I have gone even further with LED's.
I "doubled" my rear mud flaps - and "trenched" two channels between them. In this trench/channel - I ran four leads (ribbon cable).
These are connected up to my brake lights and indicators.
There are three "dimples" in the standard accessory type mudflap... sort of "period" for our vehicles.
These were moulded to allow fitting of reflectors.... I went further.
I found some super-bright red LEDS and fitted those to the centre and inner of these mouldings - the outer one, I fitted a super-bright orange one.....
You can barely notice them protruding through the dimples....just the very tip of the LED's.
When my brake lights come on - I get the normal tail-light assembly incandescents, the high level 30 strip and four at the mudflaps.
With the indicators, I also get a flashing bright orange/yellow LED in the mud-flap.
I wanted to protect all wiring - hence the doubling of the mudflap - it also makes the installation look quite "how did you?".... until I tell....
Ummmm... still to come - two strips, only of 15 though - in the glove box.
I am considering fitting a lens to the underside of all doors and fitting one of these superbright US 24 5060 panel imports into the lens.... it will be courtesy lights - unseen until a door is opened. I believe it will also highlight Sam Crupi's stainless door scuff plates - which I buffed to "chrome-like".
So, Nathan - I do hope you forgive me for highjacking your thread.... just couldn't help myself adding a few more things for you and others to consider.....
frats,
Rosco
Re: Small Betteries
Sure doesrosco wrote:but the brown lead, I beleive goes directly to the gen light bulb in your instrument cluster.
Alan
Member No.1 of the FB EK Holden Car Club of WA (Woo-hoo sweet!)
Member No.1 of the FB EK Holden Car Club of WA (Woo-hoo
Re: Small Betteries
Thanks Rosco... if I see a glow coming over the horizon one night, I'll put the kettle on for a cuppa . I grew up in the era of H-series Holdens, where extra lights were a sign of the better models. I've still got a box of curteosy door lights waiting for the wagon, and a HZ Caprice dome light (with map lights! two of them!)... maybe some LEDs will jazz up the chrome fittings .
Nathan,
I went through my records - couldn't find the manufacturer of the sealed battery I used.
Cheers,
Harv.
Nathan,
I went through my records - couldn't find the manufacturer of the sealed battery I used.
Cheers,
Harv.
327 Chev EK wagon, original EK ute for Number 1 Daughter, an FB sedan meth monster project and a BB/MD grey motored FED.
Re: Small Betteries
Thanks Harv,
you'll need sunglasses, too - those 5060 LED's are very, very bright... might take a pic of them here on the van... we're on an unpowered site... every amp counts. Currently at Undarra NP, Qld.. doing the lava tubes tour this afternoon....
frats,
Rosco
you'll need sunglasses, too - those 5060 LED's are very, very bright... might take a pic of them here on the van... we're on an unpowered site... every amp counts. Currently at Undarra NP, Qld.. doing the lava tubes tour this afternoon....
frats,
Rosco
Re: Small Betteries
Thanks Harv & Rosco, the Hi-jacking's fine
gave me something to read also... i will be looking at fitting those strips under the channels later on for sure...
I have a feeling you are the evil genius of LED's
Cheers
Nathan
gave me something to read also... i will be looking at fitting those strips under the channels later on for sure...
I have a feeling you are the evil genius of LED's
Cheers
Nathan
FB/EK Holden Car Club of W.A. Inc
Foundation Member
Foundation Member
Re: Small Betteries
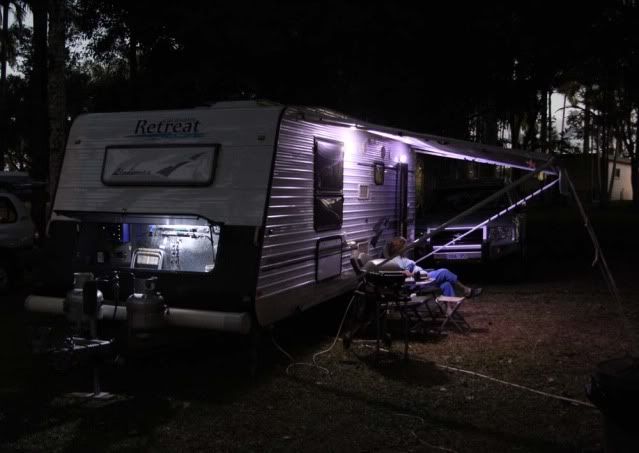
We've been off the air up north of Cooktown for a while - just remembered that I'd promised a pic of those 5060 LED's I fitted to the van.
They draw 280 mA each. I have them fitted to the two outside lights and the door courtesy light.
This pic shows them just on dusk - you can see that they are bright enough to read by at night.
The door coutesy unit is not on in this pic. I have a "marine" LED unit in the front boot of the van - it is about to be replaced with one of the USA imported SMD (surface mounted diode) units - the marine ones draw around 600 mA - for the same amount of 24 LED's.
The incandescent globes all these LED's replace used 1.2 A each (1,200 mA) - so, you can have 4 of these LED panels running for the power drain of just one incandescent globe. With only one globe, you can barely read a watch....
here's the pic - taken last week at Endeavour Falls CP - 37 km north of Cooktown.
frats,
Rosco