Page 1 of 1
Borg Warner Diff
Posted: Thu Oct 13, 2011 1:53 am
by ekstevo

Im really going to get a diff this time or get 1 shortened. ok I can work out the length to tell the diff mob do they need the car to work out the pinion angle? or will they know this ? any 1 able to help me make a plan to explain the measurements.
cheers Stevo
Re: Borg Warner Diff
Posted: Thu Oct 13, 2011 7:08 am
by Trev
Hi Steve, that looks like a volvo disc?, if so and thats what you want the volvo rear end from some of there cars are the same length as (or as close as you need) HR rear ends, so no cutting just get the spring hangers welded on.
If not dis-regard everything I just wrote

.
Re: Borg Warner Diff
Posted: Thu Oct 13, 2011 1:51 pm
by steved57
Stevo
Have a bit of a look on the web at how to set the diff pinion angle- there's plenty of useful info there. First step though is to have the diff (& motor, box & tailshaft) in the car and the car sitting at ride height. You can then tack the spring mount brackets on to the housing once you've got the pinion angle right, then whip the rear end out (again!) to weld it all up.
Cheers, Steve
Re: Borg Warner Diff
Posted: Thu Oct 13, 2011 7:54 pm
by Harv
Gents,
I may have this wrong (correct me if I have), but I think the basic process should be:
a) select the diff, and have it narrowed to fit the FB/EK shell and desired wheels.
b) make up a set of diff mounting saddles, but don't weld them on just yet.
c) mount the diff, engine and gearbox into the car (this will require some packing and clamping as the diff is loose.
d) get the car at ride height, and on level ground.
e) put a spirit level/protractor/angle finder onto the transmission oil pan rails (kinda where the red block is on the drawing below). The gearbox mounts should be shimmed so that the gearbox is sitting tail up (like the engine fan is trying to dig into the ground) by between 1-3 degrees.
f) put a spirit level/protractor/angle finder onto the diff pinion flange (kinda where the green block is on the drawing below). Rotate the diff so that the diff is sitting nose-down (like the pinion flange is trying to dig into the ground) by the same amount as the gearbox was sitting tail-down (1-3 degrees). Tack the diff saddles in place.
g) remove the diff and final weld the saddles on.
This makes the driveline the same angle at each end, and under load (as the diff snout torques up) the angles come close to zero. There is a fair bit of faffing around trying to correct for uneven ground and measuring angles at 90 degrees to how you want to measure them.
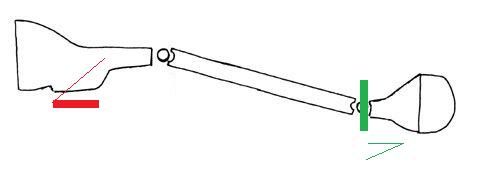
Cheers,
Harv.
Re: Borg Warner Diff
Posted: Sat Oct 15, 2011 12:17 am
by ekstevo

Would the pinion angle change to when I had the motor and box in with the original diff. if I tell the diff bloke the overall length and show him the original diff is that enough info?
Re: Borg Warner Diff
Posted: Sun Oct 16, 2011 10:40 am
by Harv
Stevo,
The pinion angle at the motor end shouldn't change unless the motor/box (or their mounts) were changed. The angle at the diff end will change depending on:
a) how thick the new mounting saddles are,
b) what angle the diff was rotated when the saddles are welded on,
c) how the rear suspension smooshes down with the new diff in place.
One way to do the welding without the car is to give the diff guy the width you want, and get him to weld the new mounting saddles on pretty much square (I suspect this is how most diffs are done anyway). You then:
make up a set of diff mounting saddles, but don't weld them on just yet.
a) mount the diff, engine and gearbox into the car.
b) get the car at ride height, and on level ground.
e) put a spirit level/protractor/angle finder onto the transmission oil pan rails. The gearbox mounts should be shimmed so that the gearbox is sitting tail up (like the engine fan is trying to dig into the ground) by between 1-3 degrees.
f) put a spirit level/protractor/angle finder onto the diff pinion flange. Shim the diff so that the diff is sitting nose-down (like the pinion flange is trying to dig into the ground) by the same amount as the gearbox was sitting tail-down (1-3 degrees).
The "shims" are made by taking some flat plate the same with as the diff saddles and grinding them into a wedge (so they tend to rotate the diff when installed. They are then installed like lowering blocks.
Cheers,
Harv.