Page 35 of 53
Progress
Posted: Tue Mar 25, 2008 10:06 pm
by Malcolm
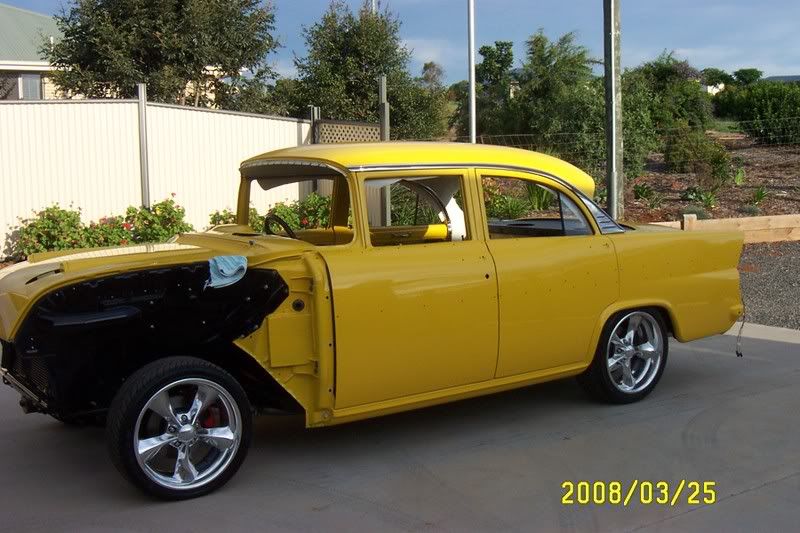
Today was another day, and the front doors are rustproofed and fitted. Have fitted all the door locks and
electric window mechs. and so on so when I get the window bailey chanel it will only be a matter of slotting
the windows in and presto they will be finished

. Also today I made the rear parcel shelf panel ready for it
to be trimmed. Also got some more polishing of trims ect. done. Didn't get around to starting on the rubbing
down of the front guards today as I was keen to see the front doors go on, and then the day just gets away
from you and before you know it, its beer o clock. Tomorrow it will be front guard day.

Cheers all
Posted: Tue Mar 25, 2008 10:10 pm
by rosco
You've got a "gift" for panels and paint Malcolm.......... I can see you are enjoying each step now........... refreshing to hear you are having a beer 'o clock - cleansing ale does wonders for ambiance................
I had a better day with the POR - blocked it back and found my toy gun was mainly to blame (along with my failing to follow instructions)
Thanks for the pix - your panel work is incredible.............. I'm looking forward to running my eyes over this.................. I'm sure I'll be chuffed....
frats,
Rosco (still the raccoon)
Posted: Tue Mar 25, 2008 10:15 pm
by EKSPCL
Very nice Malcolm. Almoist there!
Have been keeping an eye on your progress for a while.
Way too fast for me
When you extended your front doors, how did you go about it?
Did you cut the skin back, extend the door frame and then add a new width of skin?
If you have any pictures of this part that would be great!
Keep us posted!
Progress
Posted: Tue Mar 25, 2008 10:29 pm
by Malcolm
EKSPCL, I didn't get that techinical with the lengthening of the doors. I cleaned the edge down and welded a solid section to the edge of the door. Tack welding it section at a time inside and out. The piece I welded on was about 8mm long. Didn't stress about being the right length as I just ground it back then until the door gap was parallel with the rear door. Worked just fine. I then did the same with the corners of the doors. Welded on solid section and ground it back to suit. You just have to be a bit careful with the front corner of the rear door as it tends to want to dig into the center pillar. In that section of the center pillar I very carefully eased the panel inwards (belted the crap out of it) until the door had clearence. Oh yeh the other thing to watch is the rear door chrome mould clearence on the front door when opened.
All in all quite a good modification as I hated that center pillar filler panel.
Posted: Tue Mar 25, 2008 10:38 pm
by EKSPCL
Nice! that answers that sounds a lot easier when you put it that way!
Now just to decide on whether i go for it myself

Posted: Tue Mar 25, 2008 10:39 pm
by ekdave1962
Malcolm very sweet .. hope mine looks 1/2 as nice when done .. still trying to convice my daughter to go yellow rather than candy apple red .. lol ..
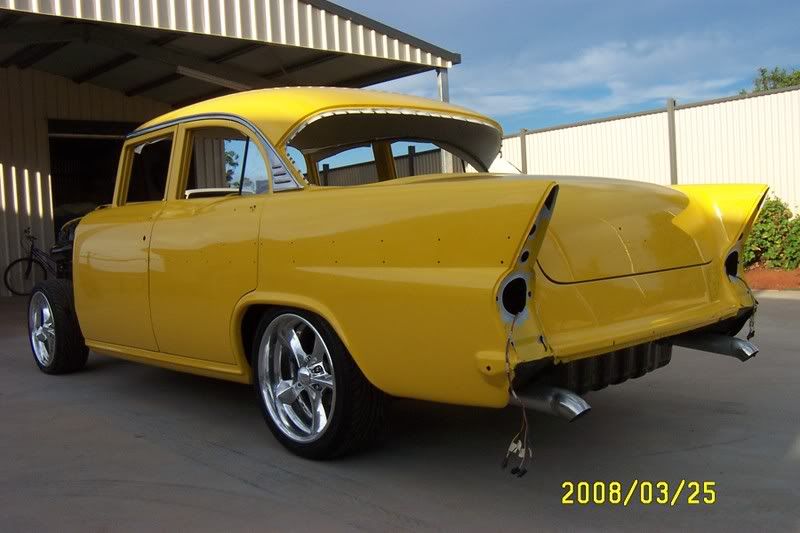
what the chorme bit on the rear roof 1/4 looks great .. is it a EK nasco bit or something u have modified to suit ..
David
Progress
Posted: Tue Mar 25, 2008 10:54 pm
by Malcolm
Dave,
Believe it or not but this car is actually a FB special, the bit you are refering to is standard FB trim.
Now its just special, made up of FB. EK, chev, commodore, &*#@, mazda, HR and leyland P76 just to name a few.
Re: Progress
Posted: Wed Mar 26, 2008 7:51 am
by mattymartin
Malcolm wrote:EKSPCL, I didn't get that techinical with the lengthening of the doors. I cleaned the edge down and welded a solid section to the edge of the door. Tack welding it section at a time inside and out. The piece I welded on was about 8mm long. Didn't stress about being the right length as I just ground it back then until the door gap was parallel with the rear door. Worked just fine. I then did the same with the corners of the doors. Welded on solid section and ground it back to suit. You just have to be a bit careful with the front corner of the rear door as it tends to want to dig into the center pillar. In that section of the center pillar I very carefully eased the panel inwards (belted the crap out of it) until the door had clearence. Oh yeh the other thing to watch is the rear door chrome mould clearence on the front door when opened.
All in all quite a good modification as I hated that center pillar filler panel.
should ask joe to do the same...
tell me malcolm, does this affect the rubbers in the doors... can you show some pics of the door open, (closeups)
nice pick up ekspcl, i would have even noticed that mod... but know that i can see it, i'm having a hard time deciding wether to hassle joe to do the same...
hey mal, next time take a photo when the suns on the whole car... NOTE, look how the sun sets of the colour on the roof...
thanks
matty martin
Posted: Wed Mar 26, 2008 1:11 pm
by Sammy
looking the goods now Mal, but whats the go with all the bullet holes in the sides of the car

Posted: Wed Mar 26, 2008 2:45 pm
by Craig
Those QLD cops will shoot at anything
Progress
Posted: Wed Mar 26, 2008 9:39 pm
by Malcolm
Hi all,
Sammy, it does have a bit of that look about it thats for sure.
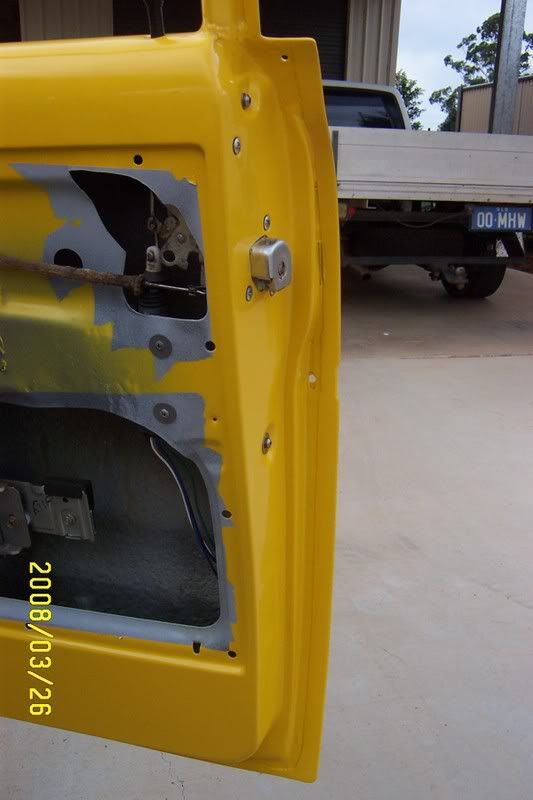
Matty, getting rid of that annoying center section between the doors is really not that hard to do. Ive added
a picture of the doors when shut without the panel

This one is of the center pillar with the section removed. Its really only the rear of the rubber area that your
getting rid off. The rubber still fits as per original

This one show the door how it looks from the inside when extended. All you really notice is the folded lip
on the rear of the door is about twice the size of the original one.
And today I got the front guards rubbed down. One needs another couple of coats of primer. Will do that tomorrow.
Today I also had the trimmer come around and show me a couple of tricks with the hood lining. I had a couple
of wrinkles in it that no amount of tensioning could get rid of
. The trimmer brings around his heat gun
and waves it over the wrinkles and hey presto they vanish before your eyes.

Tomorrow is another day..
Posted: Wed Mar 26, 2008 9:54 pm
by EKSPCL
Great stuff on the door extension pics

I think I'll go for it!
I don't know what the purpose of the door divider would have been?
Progress
Posted: Wed Mar 26, 2008 10:08 pm
by Malcolm
EKSPCL,
I think they just put them there to take the focus off how crappy the doors lined up from original.
Posted: Thu Mar 27, 2008 5:45 am
by EKSPCL
Exactly what I was thinking
Posted: Thu Mar 27, 2008 6:29 am
by mattymartin
hey thanks
malcolm great pic's, unfortunately i was a bit late... as joe has started painting...
which is great.... but bad for the doors...
thanks for posting the pics
matty martin