Page 3 of 4

Posted: Mon Oct 20, 2008 8:38 pm
by ipg
ill post it over to you next time you need it andy... (or when you run out of cutting discs :twisted: )

Posted: Fri Oct 24, 2008 9:41 pm
by karsten
wheres the pics mate your tortureing my pataince as im keen to see yours before i get some myself

how ya been anyway mate

update

Posted: Sun Nov 02, 2008 6:53 am
by rosco
Just a short (and I know no-one will believe it) update on where this project is at......

Wheels on site.
Car is up on blocks.
New mudflap plates, mudflaps and brackets have been made.
Tyres are being planned.
Rolling of guards still under investigation.
Novel compilation now extended to include coating.
Pix archived.

Current status -
Wheel id's marked and registered.
Inner wheels being coated with POR Glisten PC (3 of 5 done - another today.... perhaps).
Undecided as to whether outer chrome steel rims and/or alloy centres will be coated.... dummy alloy run currently under review using "Indy" wheel......

Got some horror stories to write up with Glisten PC, but now confident working with product...... there'll be a post or two on this when I go back to my paint thread...

pm me if you need more info

frats,
Rosco

Posted: Sun Nov 02, 2008 12:19 pm
by blue ute
The guard rollers work well but you need to take your time etc etc.
But with the EK guard profile you my need to do a bit of bashing to get the lip shaped more like a 'U' rather than an 'L' that it is - then use the roller as I'm not sure you will get enough angle from the rolling wheel.

Posted: Mon Nov 03, 2008 3:59 pm
by rosco
Thanks BU,
time is something I am very much prepared to sacrifice if it means less damage...... tyres will now not come until after Christmas (this year......) so I won't get the opportunity to see how much is needed to provide the clearance.

All five wheels now coated with Glisten PC..... inner wheels and inner rims (what is hidden by the tyre).... pretty happy with result - think I've just about mastered this stuff, it took a lot of "learning" to get the best finish possible.... anyone wanting to have a go at it... pm me ... I'm about to throw a few lines up on the POR thread I started last millenium.....

Hoping to put up a bit more of this project soon.... watch this space, those who are still interested.....


frats,
Rosco

Posted: Mon Nov 03, 2008 4:30 pm
by dave68
Rosco POR shots please.....

Posted: Mon Nov 03, 2008 8:56 pm
by parisian62
Hi Rosco,

I'd be keen to hear you experiences with glisten. Did you use glisten on your carb? or was that another product?

regards,
Stewart

Posted: Mon Nov 03, 2008 9:05 pm
by rosco
Carb was done in Glisten PC, Stewart - about to throw some pix up of the thermo cover and alternator......

frats,
Rosco

New style wheels - front

Posted: Mon Nov 03, 2008 10:20 pm
by rosco
Ok - can't remember where I left off.... this will be the last for a while - got a lot of new chores to do now that he weather is picking up.....

We have addressed the issues with clearance trouble at the rear of the car...

I want to throw some light on what is going on at the front......

As mentioned, the "new" style classic 5 spoke have an offset which is 5/8" further "inboard" of the vehicle....... great for the back where there isn't an issue until you go out to a 10" wide wheel - the handbrake cable eventually will foul the tyre..... but up front, we now get a bit tangled up with suspension.......

I chose to go with 7" wide rims to "draw" the tyre across from the outer edge - and reduce the "bulge" requiring more "lipping' and guard rolling....... it seemed logical to go this way - 205's were my original intention to fit and I wanted to keep all wheels the same size - including a spare......

You may remember, I was afforded the opportunity to borrow a 14 x 6 "new" style wheel for testing and it was at that time my measurements showed that a 7" "new" style would fit very tightly on the front.......

I came to the conclusion that there would "just" be enough clearance and the likely problems were the tie-rod end and the upper ball joint casing...
you must remember - this is a 14" rim not a 13"........

The "new" style is 5/8" further inboard - this also means that these tolerances are reduced by that amount from the "revised" or "original" styles - which most people have.........

When I got the wheels home - I put that much effort into marking up and measuring the rear wheel problem I'd almost forgotten the front.......
Both Ray Dunn (Dragway) and myself drew the conclusion from my measurements that they would fit the front - but just - 8's out of the question - 13 x 7's also a non event....... - I didn't want to go up to 15's - to me, 14's just seem to keep a normal profile..... but this is me - each to his own......

I tossed and turned on it for a few nervous nights and finally came to the conclusion I'd be forced to roll the rear guards and push out the inners....... still in deliberation on that....

I fitted up a wheel to the front and nearly fell off my perch...... at full extension of the suspension (wheel in lower most position) it just cleared the upper ball joint casing - at full lock, both left and right hands..... the edge of the rim scraped along the casing......... 8's are definitely out - and I'm almost 100% sure a 13 x 7 won't come within a bull's roar of fitting a HR disc front end..........

pix.... (to save you another 1K words)
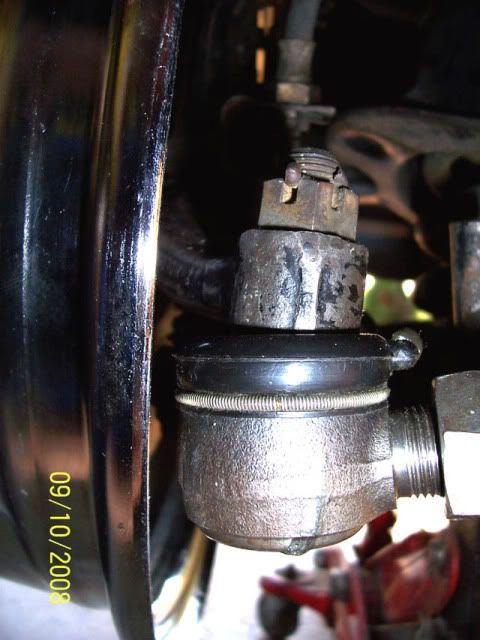
Pic 1
This is the 14 x 7 rim with the suspension almost mid - and wheels straight ahead......
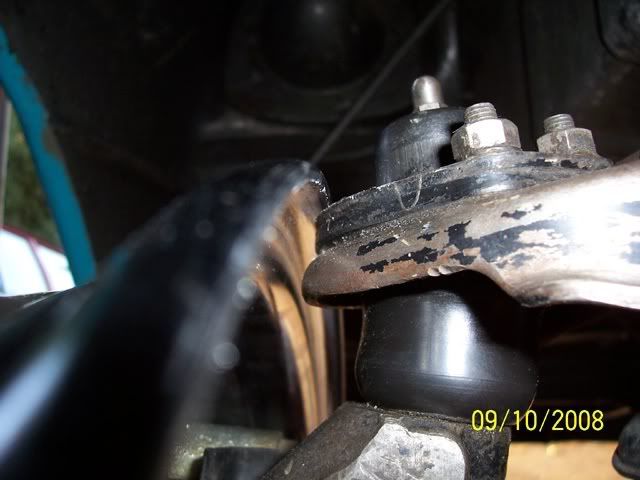
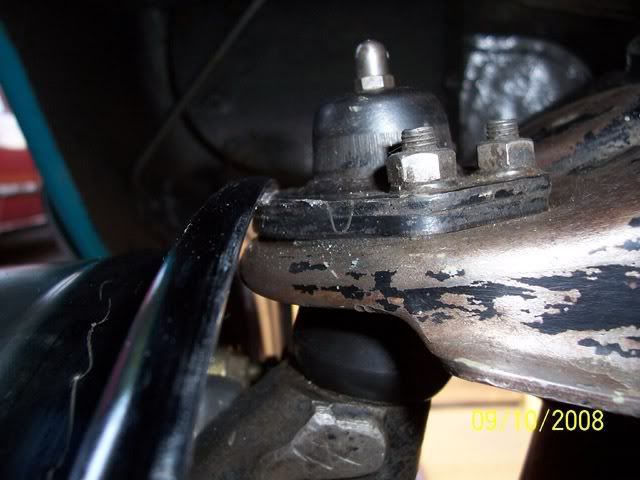
Image

Pic 2
The same rim - suspension fully lowered .......
Image

Pic 3
The same rim - from above - reveals how much of the "casing" has to be ground away to ensure the rim won't touch in use......... it's not much - but I feel has to be done...... fortunately, it's not the "meat" of the ball joint - just he outer casing and only needs approx. 3 ~ 4 mm removed - bearing in mind, it is only at full extension that this will happen and only on full r/h or l/h lock......

Image

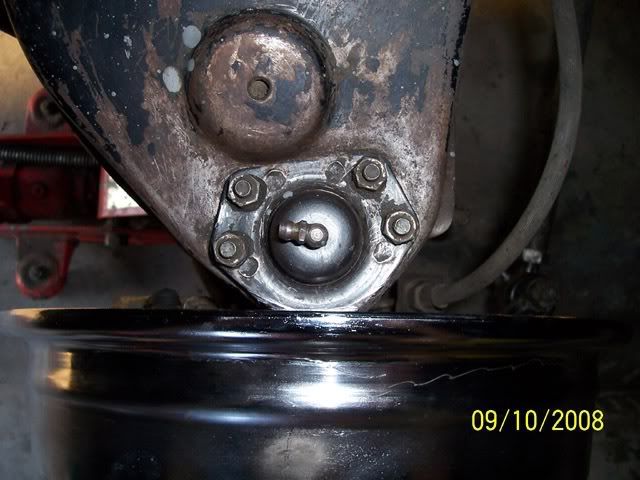
It's not a good pic, but if you scour it very carefully - you can see where I have scribed three lines into the casing of the ball joint - both in straight ahead, and each of the locks - it's along these "scribed" lines that my angle grinder will create some "tolerance"....... and of course - get a coating of POR 15 to seal the deal.........
I do possess a full set of original X-U1 wheel spacers (with factory numbers marked) but I feel the removal of a bit of "fat" is probably a better proposition....... at least this is where my systems engineer is in agreement at this point in time........

What I did not realise about wishbones - is that by their geometry (as I understand it) the upper wishbone is shorter than the lower - therefore the "arc" of both is different - the lower arc being greater than the upper one - I believe this is why the upper ball joint "draws" away from the rim as the suspension rises (wheel moves upwards).... unless someone can convince me otherwise.......?

That's about it for me for a while...... I have an arsenal of pix and measurements if anyone needs them - I knew almost nothing of wheels prior to this project....... not that I know much more now - but have been forced to evolve through the transition......

frats,
Rosco

Posted: Tue Nov 04, 2008 8:42 am
by Dee
So 14 x 6 new style should be a sinch?

Any pix of the tie rod bit of this..?

Might come back to the table yet - waiting to see your rear problem when your done..

this is good work, thanx

Dee

Posted: Fri Nov 07, 2008 6:39 pm
by rosco
Yes,
14 x 6 would now be my preferred......

Tie rod ends.......


I made very careful measurements of these when I had the loan of the 14 x 6 and it was pretty clear that there wasn't an issue..... I did understand that the upper ball joint would be close -
I now believe it being dependant on the specified "size" of supplied steel rims are - in permissible dimension of tolerance ......

It has become apparent that the 14 x 7 is the extreme case and 14 x 6 the minimum to meet the specs tolerances ........

Tie rod ends - pix

Again, this is the 14 x 7 "new" style classic 5 spoke.......

Image

Image

As the relationship between the steering arm and the wheel does not alter - fixed...... the tie rod end will remain "constant" to the rim........

They aren't an issue - I feel 13 x 7 will foul these as well - we are addressing the "new" style wheel - not the "revised"........

frats,
Rosco

Posted: Sat Nov 08, 2008 8:14 am
by Dee
Thanx,
sounds right - dont matter when they do an alinement either - the steering arm cant move - its only goin to be the other side of the tie rod which gets ajusted..

I'd be puttin in those spacers on the front just to get a bit more - you can take em out if you get sprung.. where did the outside of the tyre come on locks - idi you find it was going to rub anywhere..

Still waitin to see what happens at the back. So when are you up for that - no that I'm pushin..

Dee

Posted: Sat Nov 08, 2008 5:45 pm
by rosco
Haven't done any more for a few days - painting the inner wheels.

Spacers - not sure, will look at it again and have another play......

Won't be even thinking about putting these on until after Christmas - coupons will be needed for festive purposes.......

And, won't be doing anything to the rear until tyres are on so that I can measure what will be needed........

I might throw up another couple of pics to show how the new style wheel is assembled - there really isn't any chance of setting the rim any further inboard....... better to wait for pics before I wear your eyes out in another novel.......

stay tuned....

frats,
Rosco

Posted: Sun Nov 09, 2008 8:10 pm
by Dee
If they are orignial spacers and not just cut from sheet they should have pointers bewteen two of the studs. I saw some once come off an Xu1 and asked what they were for - didn't get an anwser so..

I might be just dumb or somehting but can any one tel me what the little pointers are in brake drums between two of the studs?

Its one thing wihch has driven me mad for years but no one had ever been able to tell me when I remember to ask..

Dr Terry - I need you again..

thanx

Dee

Posted: Sat Nov 22, 2008 9:55 pm
by Brootal
ipg wrote:roll the guards and fill them with mastic so they dont rust out.
Good tip. Wish I knew about that 20 years ago when I rolled (bashed) my rear guards to fit 235/60 Yokies. They would still scrub and the built up rubber held moisture and it ended up rusting out the arch on the driver's side. :(