Rust repairs begin - PART 1 of Resto now finished :)
-
matches
- Posts: 870
- Joined: Mon May 26, 2008 6:08 pm
- State: NOT ENTERED
- Location: port macquarie, nsw
cool, can't wait to see more progress pics, its funny how i didn't even know of any being around our places and now theres two in simultanious builds about 10 mins drive from each other. thanks again for the congrats, kimmy said thanks too, she's really happy that i've found a passion in the ek and found descent people that share the same interest as us. L&K
Aww thanks L&K & no worries. It's brilliant!!! .
Yep, It's funny the cars are so close by going thru big make-overs. Will have to take some pics of them side by side when they're both finished. Two local EK's. The only others I know of locally are fc, fe's and fj & fx..all lovely of course but no ek's or fb's unfortunately.
Yep, It's funny the cars are so close by going thru big make-overs. Will have to take some pics of them side by side when they're both finished. Two local EK's. The only others I know of locally are fc, fe's and fj & fx..all lovely of course but no ek's or fb's unfortunately.
-Never enough Chrome-
-
matches
- Posts: 870
- Joined: Mon May 26, 2008 6:08 pm
- State: NOT ENTERED
- Location: port macquarie, nsw
hell yeah, then some more with both the vans too 
 that would be cool. and with them being so close together if we are both going to the same show/meet the looks we'd get on the way would be awesome (it would of course take twice the time to get there with stopping to talk to admirers, but thats all part of it. L&K
that would be cool. and with them being so close together if we are both going to the same show/meet the looks we'd get on the way would be awesome (it would of course take twice the time to get there with stopping to talk to admirers, but thats all part of it. L&KWell it's been a busy few weeks spent working with Ron on the EK. Some good progress has been made.
The Roof is now finished. In a few weeks we will rub it down a little and give it a good buff. Heres a pick after the roof was etch primed. then given a few coats of highbuild primer , and lastly some guide coat:

After we rubbed her back , Ron hit the roof with some more guide coat , and this time we rubbed her back wet with some 600 (i think it was 600!)
After being left a day to dry out thoroughly Ron wiped the roof down with a tak cloth then applied 3 or four coats of snowcrest white. This is the result:


I will post some better pics of the roof once we have buffed it.
Next was the inside of the roof. POR 15 was used. after treating the roof with marine clean, and then metal ready the roof looked like this:

According to the instructions this is the desired effect once the metal ready
has done its job of neutralising the rust. Next on went the POR 15, It was sprayed on, two solid coats:


The hood bows were also treated with POR 15.
Next, off came the Bonnet, both front guards, and the plenum chamber? ( I think thats what its called!) Luckily there was minimal rust found this time. What little rust was sandblasted and treated.

The underside of the bonnet has now been resprayed in 2 pak . It was suggested by Ronny we go 2pak under the bonnet and plenum chamber . The Plenum chamber would have proved quite difficult and time consuming to buff up to a nice shine if we had of went with acrylic, and it made sense to go with 2pak under the bonnet, simply for the lower maintanence factor. The top of the Bonnet will be in acrylic, as we want to maintain that authentic look as best we can.


Topside of the Bonnet is now ready for topcoats of strata blue. When the weather improves this will be done.
Next job, Installing the headlining, reinstalling windscreen and rear windows. Still a few more weeks to go yet! i've gotta say this car resto stuff sure is addictive! i'm having a ball! (my bank balance isn't but thats another story
 )
)
cheers
Rohan
The Roof is now finished. In a few weeks we will rub it down a little and give it a good buff. Heres a pick after the roof was etch primed. then given a few coats of highbuild primer , and lastly some guide coat:
After we rubbed her back , Ron hit the roof with some more guide coat , and this time we rubbed her back wet with some 600 (i think it was 600!)
After being left a day to dry out thoroughly Ron wiped the roof down with a tak cloth then applied 3 or four coats of snowcrest white. This is the result:
I will post some better pics of the roof once we have buffed it.
Next was the inside of the roof. POR 15 was used. after treating the roof with marine clean, and then metal ready the roof looked like this:
According to the instructions this is the desired effect once the metal ready
has done its job of neutralising the rust. Next on went the POR 15, It was sprayed on, two solid coats:
The hood bows were also treated with POR 15.
Next, off came the Bonnet, both front guards, and the plenum chamber? ( I think thats what its called!) Luckily there was minimal rust found this time. What little rust was sandblasted and treated.
The underside of the bonnet has now been resprayed in 2 pak . It was suggested by Ronny we go 2pak under the bonnet and plenum chamber . The Plenum chamber would have proved quite difficult and time consuming to buff up to a nice shine if we had of went with acrylic, and it made sense to go with 2pak under the bonnet, simply for the lower maintanence factor. The top of the Bonnet will be in acrylic, as we want to maintain that authentic look as best we can.
Topside of the Bonnet is now ready for topcoats of strata blue. When the weather improves this will be done.
Next job, Installing the headlining, reinstalling windscreen and rear windows. Still a few more weeks to go yet! i've gotta say this car resto stuff sure is addictive! i'm having a ball! (my bank balance isn't but thats another story
)cheers
Rohan
-Never enough Chrome-

G'day Rohan,
Good to see the progress pics.You'll be happy when it's all done knowing that its been done by a professional and that you've also learn't some things about bodywork and spray painting along the way.
Wish I had an ex panelbeater living a few doors up from me
I'd be a willing apprentice!!
Good to see the progress pics.You'll be happy when it's all done knowing that its been done by a professional and that you've also learn't some things about bodywork and spray painting along the way.
Wish I had an ex panelbeater living a few doors up from me
I'd be a willing apprentice!!
I can't think what to write here so this will do.
Hi Guys, thanks for that. I nearly died when I saw how damn nice the paint was. Sooo pretty, just love it. Have had a very happy grin on our face all arvo.
Again very lucky to have Ronnie B as our yoda. The Master and his apprentice will be at it again tomorrow apparently, weather permitting.
Lulu
Again very lucky to have Ronnie B as our yoda. The Master and his apprentice will be at it again tomorrow apparently, weather permitting.
Lulu
-Never enough Chrome-
Lulu, that's coming along real nice.
The front looks a lot like mine. Mostly gone.
Keen to hear how it all goes putting it back together, were you get the rubbers from, what you use to replace the inside roof insulation, where you get the roof lining from and how much ? Keep the pictures up, love the paint.
Been off the road for over a month, that's got to be hard.

The front looks a lot like mine.
Mostly gone. Keen to hear how it all goes putting it back together, were you get the rubbers from, what you use to replace the inside roof insulation, where you get the roof lining from and how much ? Keep the pictures up, love the paint.
Been off the road for over a month, that's got to be hard.

IT's LIKE WATCHING DRUNK MONKEYS TRYING TO HUMP A FOOTBALL.

Well the first stage of our repairs/resto have now pretty much finished! We will now enjoy the wagon for a good nine months or so before we take her off the road again for stage two of the resto.
The roof was given a rub back in some 800 on a few 'dry' patches on the roof and then a total rub back with some 1200. It was then hit with some cutting compound and a buffer. The roof hasn't had a polish yet but this is the result so far:


The sun visor is yet to be painted and fitted but it shouldn't be far away.
For the inside of the roof, the POR 15 was scuffed up using a scotchbright pad before applying some trim adhesive from an aerosol can onto the surface. We then got some used headlining underfelt from some commodores, and roughly cut them to size, hit them with some adhesive and fixed them to the roof underside. We also ended up sticking some underlining on the inside of the pillars

Next we spread out the hood lining on top of the roof, carefully inserting all the bows. We then placed the lining in the wagon, putting each bow in position, starting from the front and working our way back. We then started gluing up the headlining, using a heat gun to soften up the lining
and get a good stretch on the lining while stickin it down. Clips were used to hold the lining in place while the glue was going off.


We were pretty happy with the end result. Its not perfect but it's a hell of a lot better than the original one. There are still a few small ripples in the lining but these could apparently be taken out by shrinking the lining with a steamer.

The head lining was an ebay job. The quality of the material was good and the fit was good as well. For 150 bucks we certainly arent complaining.
The two panels on each side of the radiator were treated with POR 15 , as well as the inside of the guards.

Next, Ron sprayed the Bonnet with acrylic. He used a 60/40 mix of thinners to paint and all up he put on about four or five coats. The Bonnet was left to settle for a few weeks, then cut back with the buffer and given a polish. The Bonnet bird (another ebay job!) was then fitted.

After this we started putting everything back on, as well as doing a few more small jobs. The two panels behind the grill were re painted in black, it realy makes the grill stand out better i rekon:

Front windscreen was re - fitted without breaking! its a laminated one so I was worried we were gonna break it. The rear windows were re fitted after the rust repairs were given a final spray. We used new window seals for the rear as the old ones were perished

They weren't the best fit but they still look pretty tidy.

After fitting everything else back on the car and giving it a wash , our wagon now looks like this:


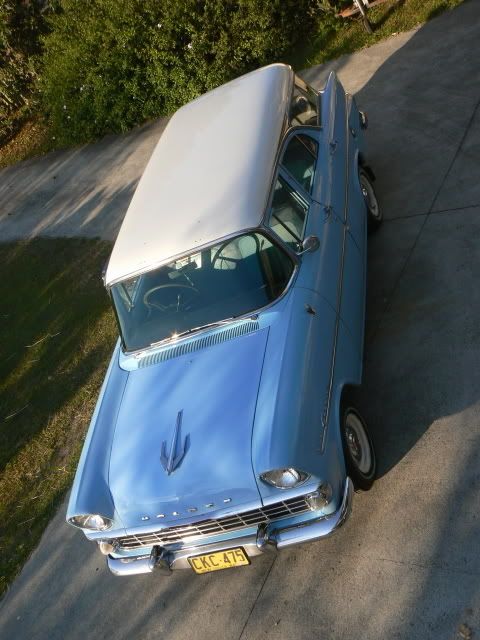
we are stoked with the results so far! Next time we take her off the road we are hoping to do:
- Full respray
- Rip seats out and POR 15 the floor
- New carpets
- Maybe some re upholstoring
Funds permitting of course!
cheers
Rohan
The roof was given a rub back in some 800 on a few 'dry' patches on the roof and then a total rub back with some 1200. It was then hit with some cutting compound and a buffer. The roof hasn't had a polish yet but this is the result so far:
The sun visor is yet to be painted and fitted but it shouldn't be far away.
For the inside of the roof, the POR 15 was scuffed up using a scotchbright pad before applying some trim adhesive from an aerosol can onto the surface. We then got some used headlining underfelt from some commodores, and roughly cut them to size, hit them with some adhesive and fixed them to the roof underside. We also ended up sticking some underlining on the inside of the pillars
Next we spread out the hood lining on top of the roof, carefully inserting all the bows. We then placed the lining in the wagon, putting each bow in position, starting from the front and working our way back. We then started gluing up the headlining, using a heat gun to soften up the lining
and get a good stretch on the lining while stickin it down. Clips were used to hold the lining in place while the glue was going off.
We were pretty happy with the end result. Its not perfect but it's a hell of a lot better than the original one. There are still a few small ripples in the lining but these could apparently be taken out by shrinking the lining with a steamer.
The head lining was an ebay job. The quality of the material was good and the fit was good as well. For 150 bucks we certainly arent complaining.
The two panels on each side of the radiator were treated with POR 15 , as well as the inside of the guards.
Next, Ron sprayed the Bonnet with acrylic. He used a 60/40 mix of thinners to paint and all up he put on about four or five coats. The Bonnet was left to settle for a few weeks, then cut back with the buffer and given a polish. The Bonnet bird (another ebay job!) was then fitted.
After this we started putting everything back on, as well as doing a few more small jobs. The two panels behind the grill were re painted in black, it realy makes the grill stand out better i rekon:
Front windscreen was re - fitted without breaking! its a laminated one so I was worried we were gonna break it. The rear windows were re fitted after the rust repairs were given a final spray. We used new window seals for the rear as the old ones were perished
They weren't the best fit but they still look pretty tidy.
After fitting everything else back on the car and giving it a wash , our wagon now looks like this:
we are stoked with the results so far! Next time we take her off the road we are hoping to do:
- Full respray
- Rip seats out and POR 15 the floor
- New carpets
- Maybe some re upholstoring
Funds permitting of course!
cheers
Rohan
-Never enough Chrome-