Page 2 of 2
Posted: Wed Apr 02, 2008 10:48 am
by rosco
I've got these posts out of order, John...
Thanks for the "slapper" info - I now appreciate how the "dimples" on the file can "shrink" metal - I would expect the larger the dimples - the more "shrink"? Obviously, there is a limit to what can be taken up - I have read on the oxy "cherry red' procedure - your pix clearly indicate how this is applied - thank-you very much - I was under the impression these heated areas were much, much larger............ your experience is certainly saving many of us much grief................
Looking forward to your progress, John.........
I'm still grinding down my fingers in the boot.......... almost wasted (with the exception of experience learned) an entire day yesterday - have some comment to make on "Tie Coat" which will certainly give those following that post some "insight" into pitfalls with it...........
once again, thanks John, very much appreciated.
frats,
Rosco
Posted: Wed Apr 02, 2008 1:40 pm
by parisian62
John, that is amazing.

Something that I think I'll only ever dream about doing. If I ever get hit by a Holden ute I'm heading your way...

regards
Stewart
Posted: Wed Apr 02, 2008 9:05 pm
by oldnek
Thats Stewart and Rosco. I'm hoping a few will gain benefit from what I am posting.
For those who!.. want to have a go, have a go. You won't gain anything without trying, and with this, it is much easier for someone to explain the proceedure and be shown it also at the same time. It's pretty hard when you see someone doing work on a panel, without understanding of what is actually going on. Then go home and attempt it yourself, thinking why is this getting worse.. "So my advise is"..... If you want to give it a try, do it and get some first hand experience. Get yourself a damaged panel from any panel shop, cause they will give you heaps of them. And with these techniques start practicing. You will be amazed at what you can do, regardless of skill level. Thats all I did.
Regards John
Posted: Wed Apr 02, 2008 10:13 pm
by oldnek
Well Guys the last of the metal repair on the rear 1/4, just a skim of filler and shes done.

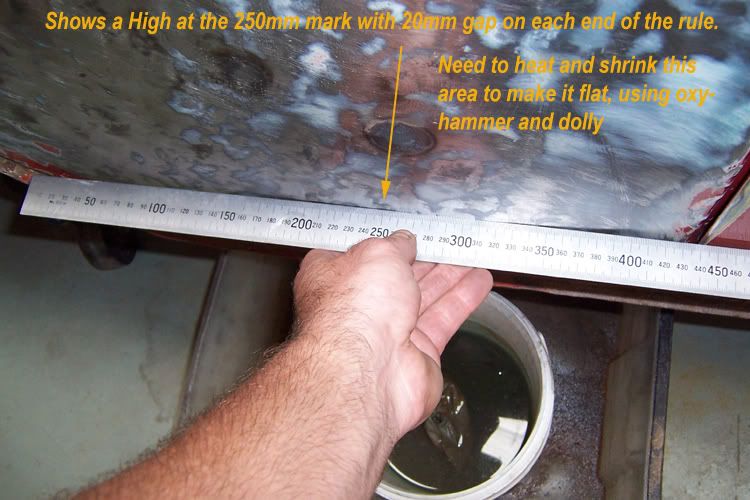
There is a high at the 250 mark on the ruler, this is the point that needs the shrinking to reduce the panel stretch. The section at the 250 mark extends up around 60mm. so it will be along the vertical for a length about 170mm at this point that I will continue shrinking.
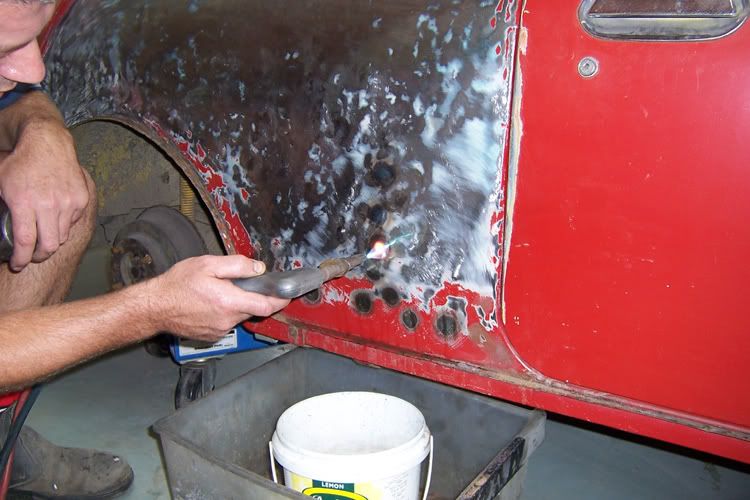
To shrink the panel. Heat the area, using a oxy to a orange/red. These hot spots only need to be around the size of a 10 cent piece. Once heated, working on the rear of the panel with a dolly, hit around the outer area in a circular motion with a flat beaters hammer, working towards the hot spot. Then use a wet rag to quench the area. The idea of this is to compress the stretched metal, back onto itself, or in another way fold the metal back in the hot spot. Tightening the panel.
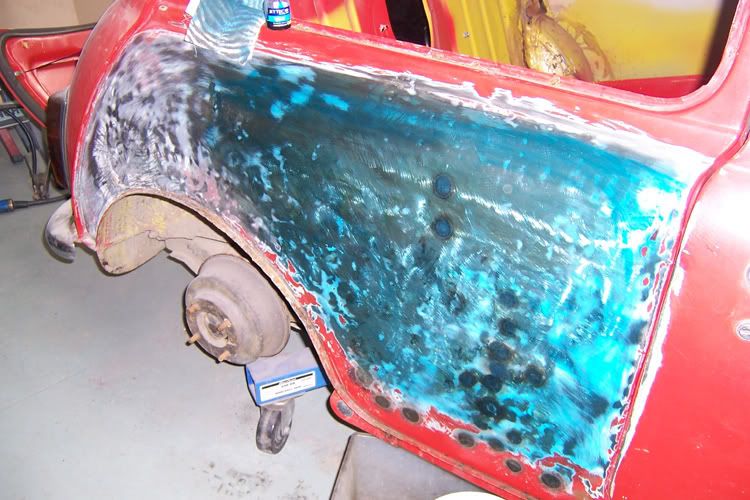
A geat tip I was given doing a metal working course years ago, is to use markers dye or bearing blue on the panel. I just used normal inkjet printer ink, on a rag and wiped over. It makes a bit of a stain on your hand though whilst your feeling the panel for straightness. This makes it easy to find all your high and low spots, when you go over the panel with a body file.
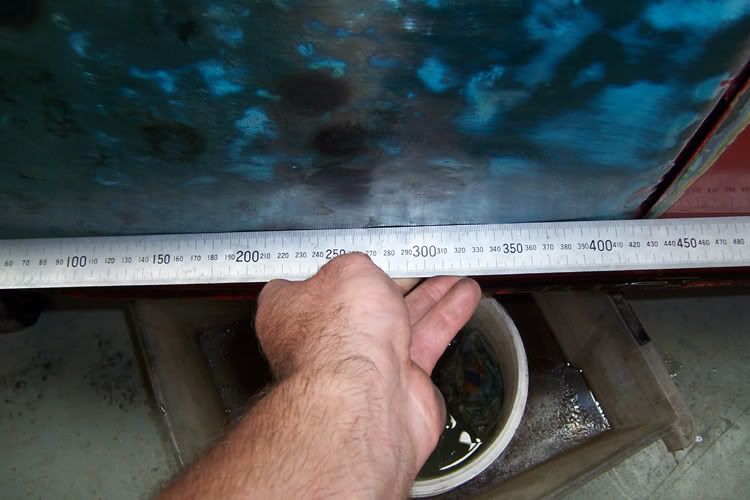
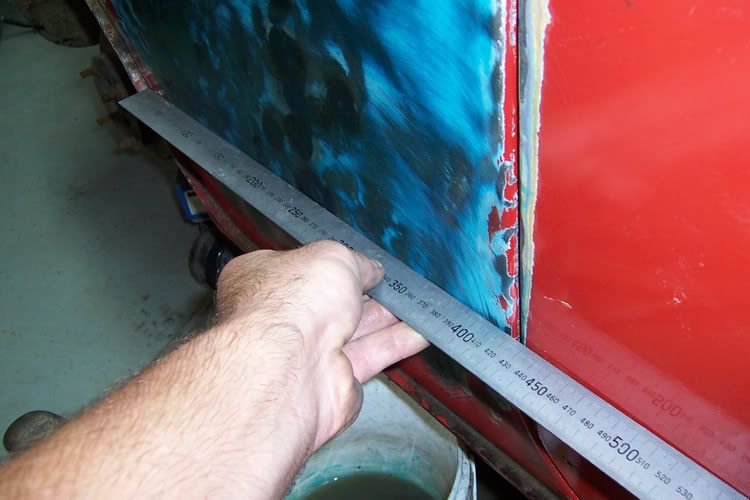
You can see here from shrinking that high along a vertical line, it has pulled the panel flat.
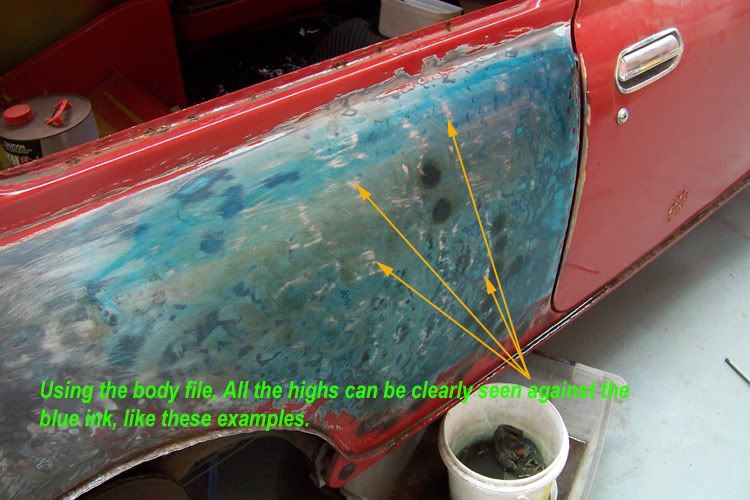
Here you can see all the highs and the lows, where there is still ink marking. Now clearly seeing where all my highs are, Use a rule to check that the highs aren't to high. You don't want any ruler rock on these points. If thats the case you may have to bring these down. So knowing that, I can now work the panel, using the dolly and slapper.
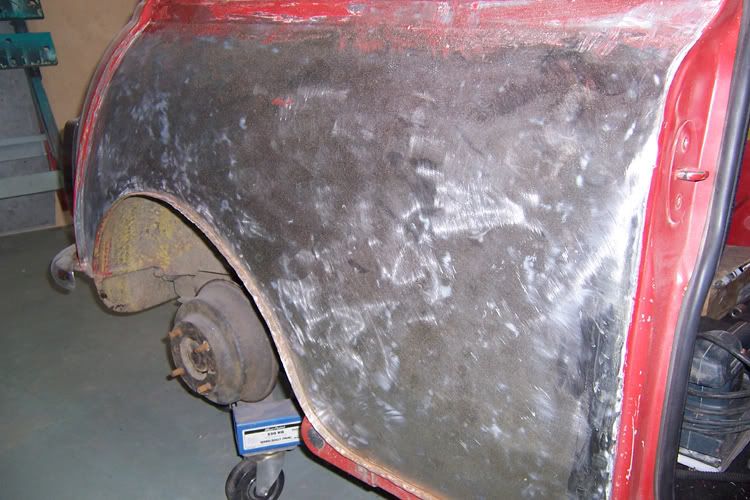
At this point I did a press test just using the finger all over the panel, to make sure there is no drummyness or soft areas, There was no worries here. But if there was a spot, then that area would need shrinking again.
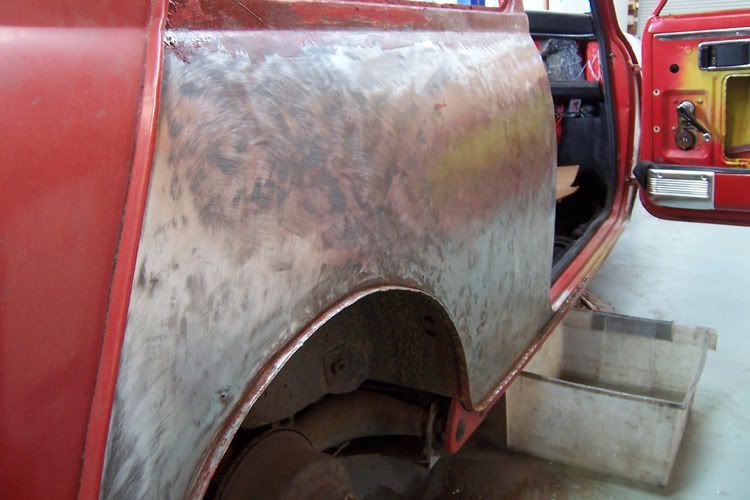
After going over with a slapper and dolly, I finished the panel off with a 9" sander, again to firm up the panel. All it needs now is a skim coat of filler, sand and primer.
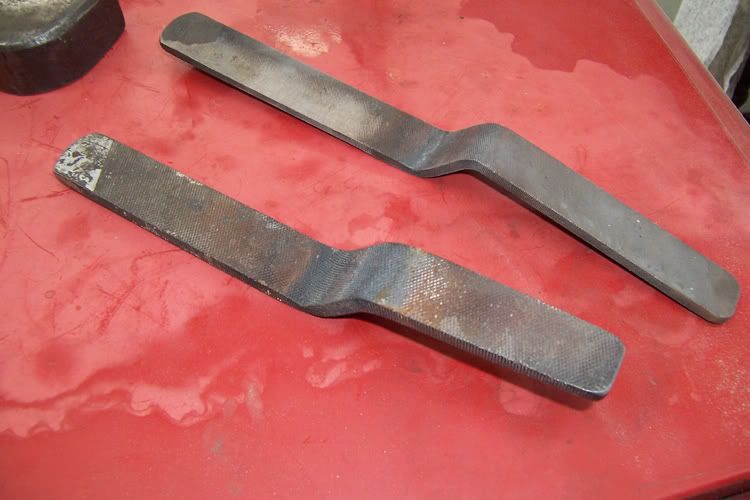
These are my slappers, which I just bent into shape using old files, that I bought at the markets. I have a fine one thats pretty light and a heavier one, thats course.
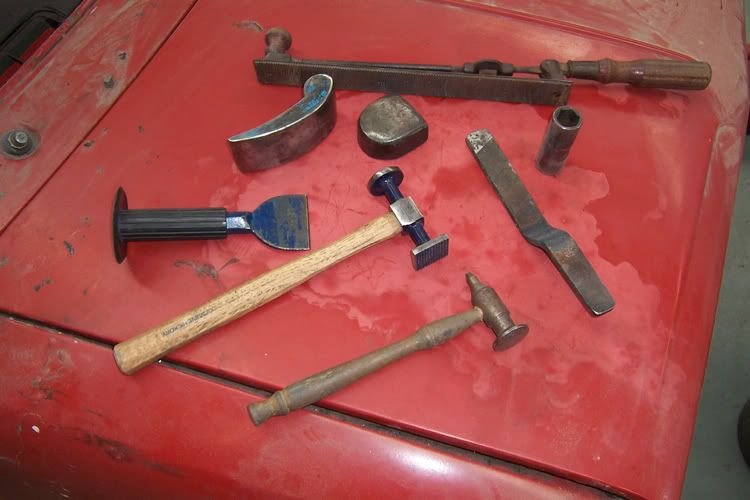
And these are all the tools that I used for the whole panel. Missing is the slide hammer with an adaptor I made for the vice grips to lock onto. The Oxy and mig and the 9" grinder/sander. You can find all these tools from garage sales and markets, I even noticed that Bowral /Narellan Toolbox is selling panel beater kits for under 50 bucks. Shore the quality may not be there but for the one off and plenty of practice they are proberly perfect for the job.
I will carry on with some filling next, Thanks for your input. Regards John
Posted: Fri Apr 04, 2008 11:01 pm
by rosco
Great John,
I hope others have got as much out of this as I have.................
I have some of the tools shown, but the slapper files are now high on my list of requireds - I have a "spare parts" car for a 1984 Meteor kept up the back yard which I intend to "play with" - none of this is going to happen until after Yamba - I have no skin left on my fingers - will type up a report on today's labour in the boot - nearly there - one more blocking down (hopefully) and then the two sessions of top coats....... I feel this will come up a treat - I hope the effort gives a satisfactory result - it hasn't been for lack of trying.
I would have jumped in much earlier with filler - you have certainly shown us that damamged panels can indeed be brought back much better than most would attempt - guess a bit of experience and technique shows clearly what you are capable of, John - well done - and I personally thank you for walking me through your process ............ well done - very instructive - a very good balance of text and pix......
frats,
Rosco
Posted: Sat Apr 05, 2008 3:23 pm
by Dave
Great post John. Your pictures & instructions should be in a book or as a special feature in a car magazine. Thanks for sharing your knowledge.
Re: Panel Repairs tips.
Posted: Fri Jul 06, 2012 12:26 am
by black57
Hi guys,
Has anyone here tried the vinegar water method for reversing rust?
Thinking of trying it but just wondering how well it works.
Pinky.
Re: Panel Repairs tips.
Posted: Fri Jul 06, 2012 10:06 am
by bootlegger
Vinegar is such a mild acid I couldnt see how it could neutralise the rust. Even rust converter has a questionable success rate. The only thing,that works is blasting or cutting it out.
Re: Panel Repairs tips.
Posted: Fri Jul 06, 2012 3:22 pm
by rosco
I'm with boot-legger, I have tried many, many different products over a span of some 40 years to stop rust ..... reversing it is impossible.
The very best which can be hoped for is to prevent it spreading. This requires removing one of the two elements which cause it..... water and oxygen.
I don't believe oxygen can ever be removed - all paints will breathe..... to some extent.
Water - good luck.... do NOT forget that water can attack from both sides of the panel.... you might fix/seal/cover the outer - but if the inner is not also done... and rust has penetrated - water (vapour even) will penetrate ..... and before long - you'll witness those horrid little bubbles growing under you perfectly stopped, sealed and painted panel.....
Cutting it out is the absolute best option..... but the damage caused due to heat will more than likely cause issues. If the replacement is not seam welded - and some form of zinc applied - there is always a chance of corrosion due to anode/cathode..... dis-similar metals..
As for vinegar - nah, not me....... unless you are referring to substituting it for a wipe over prior to laying down an etch primer..... as in a "de-oxidine" wash, wipe and dry......
I do not believe vinegar would have sufficient acidity to neutralise embedded rust.... and am not totally convinced it would likewise do the same with a bare steel panel exposed even for the shortest period of time....... 1/2 an hour... especially in humidity....
Ask anyone who has sprayed a bare metal panel in humid conditions - without immediately previous application of a de-oxidine......
It may take months, seasons or even years.... but sooner or later - those little bubbles will appear when humidity is almost at saturation... only to disappear and actually consist of dimples on the very hottest/driest day.....
Do the right thing when painting - avoid humidity and always treat bare steel with a de-oxidine process immediately prior to the etch primer.... or 1k etch....
frats,
Rosco
Re:
Posted: Wed Jul 25, 2012 9:40 pm
by notnad kram
oldnek wrote:Thats Stewart and Rosco. I'm hoping a few will gain benefit from what I am posting.
For those who!.. want to have a go, have a go. You won't gain anything without trying, and with this, it is much easier for someone to explain the proceedure and be shown it also at the same time. It's pretty hard when you see someone doing work on a panel, without understanding of what is actually going on. Then go home and attempt it yourself, thinking why is this getting worse.. "So my advise is"..... If you want to give it a try, do it and get some first hand experience. Get yourself a damaged panel from any panel shop, cause they will give you heaps of them. And with these techniques start practicing. You will be amazed at what you can do, regardless of skill level. Thats all I did.
Regards John
good stuff

Re: Panel Repairs tips.
Posted: Wed Jul 25, 2012 9:53 pm
by notnad kram
great posts, learnt heaps, will be looking out for more of your posts, need something on welding repair sections...
Re: Panel Repairs tips.
Posted: Thu Oct 04, 2012 7:08 am
by Marty K Bird
This was a great read, thanks for sharing!
Re: Panel Repairs tips.
Posted: Mon Mar 11, 2013 8:28 pm
by baker12
Genius!!!!!
Did I mention the word GENIUS!!!!
Love this stuff a lost art.
Re: Panel Repairs tips.
Posted: Thu Aug 07, 2014 4:50 pm
by Mick Jagger
a must read!


