EK Wagon project - Total rebuild

Post photos of your pride and joy, or updates on your rebuild!

Moderators: reidy, Blacky

EK JAY
Posts: 1886
Joined: Sat Mar 17, 2007 8:25 pm
State: NSW
Location: Sawtell

Re: EK Wagon project - Total rebuild

Post by EK JAY »

just a thought check all the excelerator linkages around the carby are on right and back in the same position as they were before you took
them off for extractor fit up
had similar sort of thing with the red wagon idle was rough up and down linkage needed to be adjusted

and yep nice plates mate well done :thumbsup: :clap:
EK JAY SINCE 1990
Finny
Posts: 1895
Joined: Tue Mar 18, 2008 10:30 pm
State: QLD
Location: Brisbane North
Contact:

Re: EK Wagon project - Total rebuild

Post by Finny »

Rosco the engine does "hunt", not a smooth idle.
Revs OK (just seems a little delayed with a slight miss), but NOT when under any load.
Doing another spark plug removal test today and it actually stalled when I removed the 3rd one.
It is getting worse.
Taking off, I am concerned that it won't get across an intersection without stalling, unless I rev it high.
Will do a video and record the sounds, but I'm thinking its the stupid manifold gasket I was given to use.
I could fill around all the joints with more gasket goo to try and seal it.
Or pull it all off and use the previous gasket which was a nice close fit.

I'm thinking of pulling it all back off and redoing to tomorrow. :( :evil:
Image
IT's LIKE WATCHING DRUNK MONKEYS TRYING TO HUMP A FOOTBALL.
User avatar
WayneXG95
Posts: 2565
Joined: Wed Sep 07, 2011 9:42 am
State: NSW
Location: Sydney

Re: EK Wagon project - Total rebuild

Post by WayneXG95 »

Could it be air in the vacum advance?
Wayne Chambers
President
FB EK Holden Car Club of N.S.W
rosco
Posts: 2569
Joined: Wed Feb 04, 2004 8:34 pm
State: VIC
Location: Melbourne

Re: EK Wagon project - Total rebuild

Post by rosco »

Finny, its a bit hard for me from down here - but, I'd like to be able to take a close look at the inlet manifold to head points.

The symptoms are beginning to sound like the rear two are starving for fuel - and this suggests the rear port of the inlet manifold is not sealing properly.

There is every chance that the bolts both sides of that port are not exerting enough compression on the manifold inlet pads - but are just bearing fully on the extractor pads - resulting in that inlet port not sealing.

Tim mentioned back a page or two that the bolt mounting pads on extractors are usually thicker than that of the inlet manifold - this was also the case with mine - not having a grinder to bring the thickness of he extractor mounts down to that of the inlet manifold way back then, I shimmed up the inlet manifold mounts so that they kept the bolt mounting plate parallel to the head as it was screwed down.

I did not use one of those aluminium manifold gaskets - I used a very thick fibre one - it helped a little in ensuring a seal with the different gaps - I did not use any sealing compound.

Just to rule this out, do you have a timing light? - I would like to know that the timing is not too far advanced - revving freely without load, losing power applying load and a bit lumpy at idle can also be the symptoms of a far too advanced ignition timing - it's most likely not the case here.. I just would like to rule that out before you start pulling stuff off.

#3 is obviously the most powerful of your cylinders. It probably has the highest compression.
#'s 5 & 6 are your weakest - but we haven't determined if there is a head gasket issue either - between 5 & 6.... a compression test would rule that little monster out...a blown head gasket between them would also give all the symptoms you post. If you have a compression gauge, now would be the time to check them all - in particular 5 & 6.

If you haven't changed anything with the engine other than fitting extractors - it still should be running as it was..... from memory (too lazy to check back through this large thread) the engine was taken out whilst all these refurbs were done - not touched, then simply re-fitted - the only changes being extractors and making up the carby linkages.

I tried to pay close attention to the pix you posted of the engine manifolds - but the rear ones were obscured by the carby.....
The simple ignition timing and compression tests would help us a long way to getting this sorted for you, Finny.... if you have done these already - please tell us.
Did you check your plug leads for correct numbering? - if you did, I didn't see the reply.

Keep us posted on your findings.

frats,
Rosco
User avatar
Craig Allardyce
Posts: 1464
Joined: Sun Aug 07, 2011 7:26 pm
State: VIC
Location: Stratford

Re: EK Wagon project - Total rebuild

Post by Craig Allardyce »

Well done Finny on getting her on the road!
rosco
Posts: 2569
Joined: Wed Feb 04, 2004 8:34 pm
State: VIC
Location: Melbourne

Re: EK Wagon project - Total rebuild

Post by rosco »

We were all typing at the same time.... guess mine came in last because it was longer....

We'll know more about those tubes when Finny pulls off the manifolds - I'd like to see a pic down from the top of the rear inlet manifold mount before these bolts are undone.

Wayne, it's unlikely that any air in the vacuum advance will cause it to lose power under load..... if anything, the vacuum has to be destroyed under load - so that the timing is more retarded.....
There is no vacuum at all in the distributor advance line when idling - the butterfly in the throttle body closes below the vacuum port for the distributor.
Above idle, the port gets admission to the underside of the butterfly - and vacuum then draws on the distributor advance diaphragm.
If it were sucking air - that advance would not be effected and it is more likely that the engine would not rev free..... it might make the mix marginally leaner by the very small amount of air entering the carby body.... but I don't believe it would amount to any noticeable change.

I'm still stuck on that rear port of the inlet manifold.... there's something wrong back there - blasted extractors, aftermarket manufacturers make these up for all sorts of engines - I am guessing the port bases are all from one stock supply size then the pipes bent and welded into position .... and will not be a good fit for any of the engines "suited" for.

Tim, those port tubes can be crushed or distorted if the inlet manifold is bolted down out of kilter - I don't know how hard it is to replace them... never done it. They would have to be a long way out to sit up on the tube - the other two should bring the rear one into line - but it is possible... or the gasket was damaged during installation by trapping it between the manifold and tube.

frats,
Rosco
Last edited by rosco on Fri Jan 31, 2014 9:20 am, edited 1 time in total.
rosco
Posts: 2569
Joined: Wed Feb 04, 2004 8:34 pm
State: VIC
Location: Melbourne

Re: EK Wagon project - Total rebuild

Post by rosco »

We were all typing at the same time.... guess mine came in last because it was longer....

We'll know more about those tubes when Finny pulls off the manifolds - I'd like to see a pic down from the top of the rear inlet manifold mount before these bolts are undone.

Wayne, it's unlikely that any air in the vacuum advance will cause it to lose power under load..... if anything, the vacuum has to be destroyed under load - so that the timing is more retarded.....
There is no vacuum advance at all when idling - the butterfly in the throttle body closes below the vacuum port for the distributor.
Above idle, the port gets admission to the underside of the butterfly - and vacuum then draws on the distributor advance diaphragm.
If it were sucking air - that advance would not be effected and it is more likely that the engine would not rev free..... it might make the mix marginally leaner by the very small amount of air entering the carby body.... but I don't believe it would amount to any noticeable change.

I'm still stuck on that rear port of the inlet manifold.... there's something wrong back there - blasted extractors, aftermarket manufacturers make these up for all sorts of engines - I am guessing the port bases are all from one stock supply size then the pipes bent and welded into position .... and will not be a good fit for any of the engines "suited" for.

Tim, those port tubes can be crushed or distorted if the inlet manifold is bolted down out of kilter - I don't know how hard it is to replace them... never done it. They would have to be a long way out to sit up on the tube - the other two should bring the rear one into line - but it is possible... or the gasket was damaged during installation by trapping it between the manifold and tube.

frats,
Rosco
rosco
Posts: 2569
Joined: Wed Feb 04, 2004 8:34 pm
State: VIC
Location: Melbourne

Re: EK Wagon project - Total rebuild

Post by rosco »

[quote="Finny"]

The car drove several kilometres to get the rego done, and it drove and ran perfectly. :D :D
That was before I removed the carbi, inlet, etc and put the extractors in.


Just re-read this, Tim - manifold/gasket for mine at the moment too....

frats,
Rosco
User avatar
WayneXG95
Posts: 2565
Joined: Wed Sep 07, 2011 9:42 am
State: NSW
Location: Sydney

Re: EK Wagon project - Total rebuild

Post by WayneXG95 »

Agreed Rosce, I only mentioned it because I had the same problem and it turned out to be a hole in the distributor advance line.
Finny are you sure you conected to line to the carb correctly and not threaded it?
Just a thought.. :problem:

I'll back out now.. :shifty:

Great work on the rego, can't wait to see it at the nats mate.. :wave:
Wayne Chambers
President
FB EK Holden Car Club of N.S.W
Finny
Posts: 1895
Joined: Tue Mar 18, 2008 10:30 pm
State: QLD
Location: Brisbane North
Contact:

Re: EK Wagon project - Total rebuild

Post by Finny »

I learnt many, many years ago that the most logical reasons are not always the correct ones.
I was working on a car and again it wouldn't run (Seems to be a theme there), so I checked, double and triple checked what I had been touching.
It seemed that not one but two faults had developed in areas totally separate areas.
Strange that it was co-incidently at the same time. :shock: :shock:

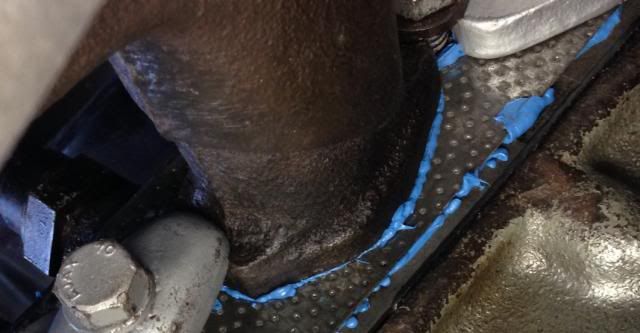
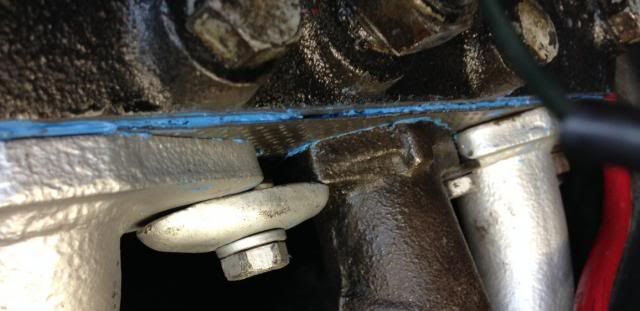
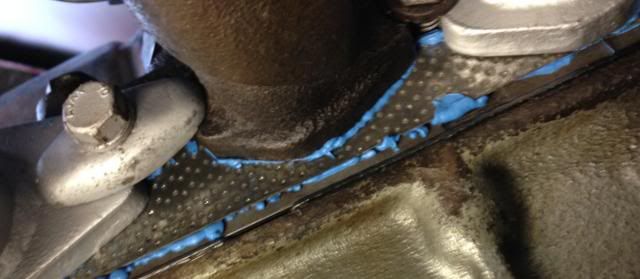
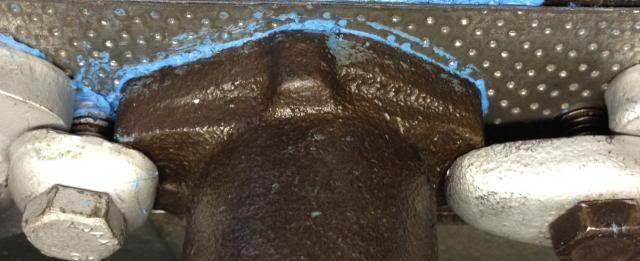
Couple of photos of the manifold connections.
They actually all looked to be fairly well sealed, especially underneath.

Image

Image

Image

Image

Did another drive around the block.
Was hard to start but ran OK at first then missing again :( :(

Did a compression test this afternoon and they were all around the 90 mark.
Certainly down on specs but consistent. :?

However what I did find was a little strange. :shock: :shock: :shock:

Image

Image

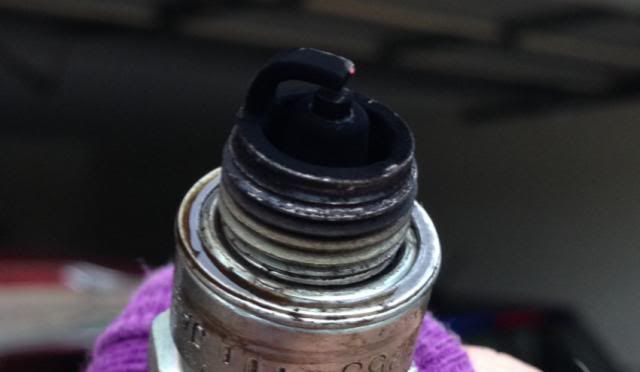
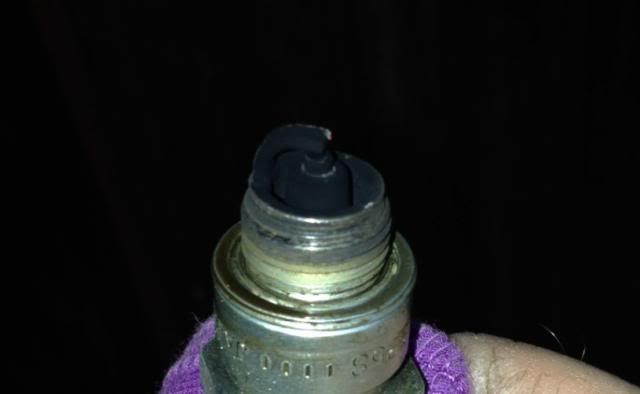
Every plug was black, and a moist black.
I gave them a light clean before putting them back in.
Didn't get to drive it but started it after the compression test.
It seems to start really well again and rev and idle well.
Will do a block drive tomorrow.
If it's running well again, :D :D then I'm looking for a new cause. :shock: :shock:
Image
IT's LIKE WATCHING DRUNK MONKEYS TRYING TO HUMP A FOOTBALL.
Bluehaze
Posts: 350
Joined: Tue Jun 22, 2004 3:51 pm
State: NOT ENTERED
Location: Croydon, Vic

Post by Bluehaze »

Looking at those plugs, I can't see anything that could be relating to air leaks or starvation for fuel, both oh which will cause a lean-out situation. Those plugs tell me either you're too rich, or the plugs are too cold. Either way, the performance will deteriorate as the plugs foul up. Sick plugs are going to mis-behave under load, rather than at idle. This might explain why performance has changed.
I'm assuming the dwell and advance are where they should be. (Weak spark due to lack of dwell or a crook coil can cause excess miss under load)
rosco
Posts: 2569
Joined: Wed Feb 04, 2004 8:34 pm
State: VIC
Location: Melbourne

Re: EK Wagon project - Total rebuild

Post by rosco »

Ok - the plot thickens...

I'm happy with the look of that rear inlet manifold mount.... before seeing the pix you have posted, I believed the depth of the extractor/head mount pads were much higher than that of the inlet mounts.... and that the bolt connector was not parallel to the head... in this case, the bracket can get "cocked" resulting on the bolt locking down only on one side - and only applying pressure to the thicker pad... hope that makes sense.... from what I can see - your connector is parallel and it should be applying equal force to both manifolds.

We're now in another search - I'm still a bit baffled why #5 & #6 didn't make as much difference to the rpms as the others when each plug lead was disconnected.
Your compressions were all around the 90 - so the balance should have been similar in the drop of rpms for each cylinder.

I still believe there is "something" with the inlet manifold at the rear.... your pix of the fitting to the head look to be a perfect mounting (in fact - better than required) - are there any other tappings, or cracks around the rear of the manifold?

If, after cleaning the plugs - the engine ran fine.... suggests we are tracking down either a fuel or ignition fault - it could very well have been that #5 & #6 were a bit more fouled than the others when doing the balance..... but why?

Black deposits usually result from unburned or excessive fuel... usually carby, but this can also be caused by some malfunction in the ignition system... so we mustn't jump straight onto fuel as the culprit. We don't know what condition the plugs were in prior to the fitting of extractors - so, will have to wait and see what they are like after the next run.

"The plugs were all wet" - this bit directs us away from any one or two cylinders.
It is more directed towards a common cause - i.e. - all cylinders... and the two areas we should address are carby and ignition...

You haven't touched anything with the ignition system? - but we do know you've tipped the carby upside down - and done a bit of work on the linkages.

The only things which connect the carby are - main body flange to inlet manifold, fuel line pipe, vacuum line pipe, throttle lever to butterfly shaft, throttle shaft to choke shaft rod and the choke cable and lever.

If the flange mount was sucking air - it would not enrichen the mix - and all the plugs wouldn't be wet.

I can't see how either the fuel or vacuum line would cause the carby to run rich.
I'm still working through the throttle connections ...... and the choke cable.... there is a common link here which would result in a fault.

When you made up the link rod from the firewall lever to the carby - is there any chance that you have somehow managed to foul the carby connecting lever from the throttle shaft to the choke control lever?

The idle speed would have been raised if it kicked up the link rod - if this was the case - but if it was forcing the choke to open fully again when the throttle returned to idle - it could be that your throttle lever is closing the choke in unison ...
Just check that your new throttle rod doesn't pull the choke lever closed when you open the throttle... do this with the engine stopped and the air cleaner removed.

Next question - have you checked that your choke is fully open?... with the dash knob fully in? I'm only asking this because we need to rule it out. I like to leave my choke adjustment just out a fraction from the dash... that way, I know when I push in the choke - its the choke arm in the carby that stops the button being fully pressed in to the dash.

When the motor starts to act up again, - remove the air cleaner and ensure that the choke is fully open?

I'm still working on fuel at the moment - as it was the carby which was turned upside down.... two things in here which could have been affected.

None of the carby external adjustments are going to cause the faults you have - and I am very hesitant to start pulling things apart when we can easily check the ignition timing and points quickly before staring down the barrel a pulling carbies apart... it's a pretty time consuming and can be dangerous procedure..... let's rule out ignition as best we can first....

Have you got a timing light, Finny?.... and have you checked the timing? If you haven't, I might suggest getting one - they are relatively cheap - and I carry mine with me on long trips - makes it just so easy to rule ignition out when trouble strikes.

If you have a timing light - check that the light flashes somewhere with the inspection cover pointer near the ball on the flywheel - with an engine which has lost a bit of compression - it's ok to have this one or two degrees advanced to create a bit of "induced" false compression.

I'd take a look at the condition of the point faces next - then slip a feeler gauge between them ....... none of this makes sense.. because it can run fine.....after cleaning the plugs - but an intermittent fault can be a monster to find.
Check the points and timing - and we can rule those out for now.

Coils, generally either work or die.... condensor trouble will likely show up with burned point faces and a lot of white "ash" around the gap - just check all your leads and connections - and yes, if you have a spare HT lead from the coil to the distributor - I'd change that over and test the engine again (I carry a spare one of those too).

These are all pretty easy things to check - and I'd run through checking them over before getting to the next bit.. my next line of investigation gets serious, detailed and demanding from here on.

If you're happy with ignition - we need to start and look at fuel..... and here it begins to get troublesome, potentially dangerous and very time consuming.

There are two systems within the carby which can result in an over-rich problem.
The first is the float level, the second is the power by-pass valve and vacuum piston.

Checking the float level is a very dangerous procedure - and has injury/damage potential - the motor is hot, the weather is hot - and you will be opening up the carby exposing the fuel in the carby bowl..... lots of care, please - and if you have a fire extinguisher, it won't hurt to have it handy.

You need to remove the air horn (six screws) to check the float level.
The vehicle should be on level ground - in all directions.

If there is a fault - because your engine is running rich - then when you remove the air horn (with engine stopped) - just be careful - the float bowl might pretty much filled up near the top of the body.

If this is the case - then you should replace and set a new float needle and seat.
It probably won't have altered it's setting - as this is done by bending the tang on the float arm - but the needle and seat could have been damaged - especially if it was banged around upside down.

I'd rule out the float itself - because if it was damaged and full of fuel - the motor would not have come good at all.... it would be permanently flooded.

The float needle and seat can play up intermittently - spluttering its feed with the normal pulsing shake of the engine.
If anything, it will be failing to close off... and filling the chamber with more fuel than it wants.

The level of fuel is approximately 5/8th" - 11/16th" below the surface of the main body - if it's higher, there's an issue.... fitting a new needle and seat requires adjusting the level with the engine running... let's not go there yet.. but check that the level is not above where it should be when you pop off the air horn.

The only way you can check the float level is with the engine operating, the air horn removed and the vacuum passage in the main body blocked off...... the level of fuel should then act on the float, which opens the needle in its seat when the level falls - and allows more fuel to enter and lift the float up until it closes the needle in its seat again..

The second thing which can cause a very rich mix is the power by-pass valve and vacuum piston.
This valve will be closed when there is enough vacuum within the carby (nothing to do with the vacuum advance port under the throttle butterfly - but a permanent passage through the main body of the carby and connected at all times) to hold the piston up in the air horn cover against the spring around its shaft. The valve will then close upwards and seal off fuel into the delivery port by its own little spring.

If that power piston is sticking down - or the valve is not closing - the carby will run permanently rich....

Check that the piston can move freely up and down against its spring - it will probably have some places where it feels like it's just sticking - this is normal - as it acts differently when vacuum controls the piston.. but it should not bind and stick in any one position.

Take a peek down at the power by-pass valve - carefully use something to press down on the little pin and see that it opens and closes by its spring.

If you want to - and I probably would suggest to, having come this far - use a wide bladed screwdriver to unscrew the valve - make absolutely certain that this screw driver presses down on the pin whilst it fits fully into the two slots - or you'll damage the pin.
There is a copper washer under the head of the valve.....
I'd probably very gently try turning the valve clockwise first - just to ensure it wasn't loose in the first place - that would certainly cause a rich mixture.

If you pull it out, clean it and blow/suck from the carby side to check that the valve closes when the pin is released..... yes, probably all working fine - but worth a check - and could have been a cause of your symptoms.

I'm not convinced about this being the main fault yet, as you state that the motor lacks power when under load..... this valve would be required to be open for power and I'm probably veering off course..... if it wasn't opening, it certainly would have struggled with any load - and would not be causing the wet plugs.

Of course, those blackened plugs might have had something to do with the miss under load.....even if the power by-pass valve is working properly.

Starting to "tilt at windmills" here, Finny.. just need to rule out each of these possibles - and from the easiest and quickest first...
Try the ignition first - then take a peek at the fuel level in the carby.
Don't go any further with the carby yet though, if the float level is fine and the power by-pass piston and valve seem to be working and fitted ok - we can look deeper later on.

We've still got a lot of possibilities - but answers to the above are going to make it easier to localise your issue/s.

Waiting until you come back with some more findings..
I can re-define the search when you answer some of the above..

frats,
Rosco
Last edited by rosco on Sat Feb 01, 2014 3:28 pm, edited 2 times in total.
User avatar
WayneXG95
Posts: 2565
Joined: Wed Sep 07, 2011 9:42 am
State: NSW
Location: Sydney

Re: EK Wagon project - Total rebuild

Post by WayneXG95 »

Bit of a novelist our Rosce...:)
Wayne Chambers
President
FB EK Holden Car Club of N.S.W
rosco
Posts: 2569
Joined: Wed Feb 04, 2004 8:34 pm
State: VIC
Location: Melbourne

Re: EK Wagon project - Total rebuild

Post by rosco »

"Bit"?

Shortest ever reply from me, Wayne..

frats,
Rosco
Finny
Posts: 1895
Joined: Tue Mar 18, 2008 10:30 pm
State: QLD
Location: Brisbane North
Contact:

Re: EK Wagon project - Total rebuild

Post by Finny »

Rosco, I'm going to grab some lunch and sit down and read your previous post.

Wayne, I have seen them a LOT longer..................... :lol: :lol:

Did a block drive and it seemed much better but still not good.

Disconnected everything and did a proper compression test this morning, dry only, haven't done wet yet.
1 = 135
2 = 127
3 = 120
4 = 115
5 = 105
6 = 130

Bit concerned about number 5, and amazed at number 6.
Read some older posts regarding replacement spark plugs for the old AC46's.
One suggested that a NGK BP5ES was the correct replacement.
The wagon had NGK BP5S in it.

I actually have some old BP5ES plugs and they are quite a bit longer. :? :? :? :shock:
I'm going down to buy some new plugs, but unsure what the correct ones should be.
I check the guides in the store.
Image
IT's LIKE WATCHING DRUNK MONKEYS TRYING TO HUMP A FOOTBALL.
Post Reply